
Install /e/OS on a Samsung - Galaxy S20 /S20 5G x1s
This guide installs /e/OS on your x1s. Read it through once before you start, so you don’t hit surprises partway in. Downgrading from a newer OS version than the /e/OS build you’re about to install can cause instability or brick some devices — check your current OS version first. Flashing is done at your own risk: /e/OS builds are provided as best effort, without any guarantee, and the /e/OS project takes no responsibility for the consequences.
Requirements
- Back up your important data to an external storage device — some of the steps below format the phone, wiping any backup left on it.
- Charge your phone above 50%.
- Enable
adbon your PC — setup instructions. - Download every file listed in the Downloads section below before you start.
- Use a real data cable — some cables only charge and can’t transfer data.
- Enable USB debugging on your device — instructions.
- Confirm your exact model in the Device Selector: where shown, hover the device name for the supported model number, and check it matches yours exactly.
- Boot the stock OS at least once and check everything works — SMS, calls, and both over WiFi and LTE if available (some devices need VoLTE/VoWiFi used once on stock to provision IMS). Whatever’s broken on stock stays broken on /e/OS.
Downloads for x1s
Each build includes /e/OS Recovery — no separate download needed.
Not sure which one to pick? See official vs. community builds.
Before following these instructions please ensure that the device is on the latest Android 13 firmware.
If your device is currently using a newer or older version than the required version, please upgrade or downgrade to the required version before proceeding with your /e/OS installation.
The required version is Android 13 , which may be lower than the /e/OS version you are about to install - this is not an error! If there are multiple updates of that version (e.g. security updates), make sure to use the latest!
If you need to upgrade or downgrade your device, please search online for guides. We are unable to provide specific instructions here and on our support platforms.
Preparing for installation using Heimdall
Samsung devices come with a unique boot mode called “Download mode”, which is very similar to “Fastboot mode” on some devices with unlocked bootloaders. Heimdall is a cross-platform, open-source tool for interfacing with Download mode on Samsung devices. The preferred method of installing a custom recovery is through this boot mode – rooting the stock firmware is neither necessary nor required.
Please note: On windows PC’s to run the installation using ODIN check this HOWTO. The steps given below explain how to install Heimdall and flash /e/OS
- Enable OEM unlock in the Developer options under device Settings.
It appears sometime that the OEM unlock option is missing from Development options, especially on new devices. Please connect your device to the wifi and check of system updates. After a reboot, the option should appear.
Install Heimdall or if you prefer you can Build latest Heimdall suite
Power off the device and connect the USB adapter to the computer (but not to the device, yet).
Boot into download mode:
- hold Volume Down + Volume Up and connect the USB cable to PC.
You must accept/continue with the warning in “Download mode” to unlock the bootloader (see image below). You can accept/continue by short-pressing the
Volume UPbutton. Then, connect your device with your PC if you have already not done it.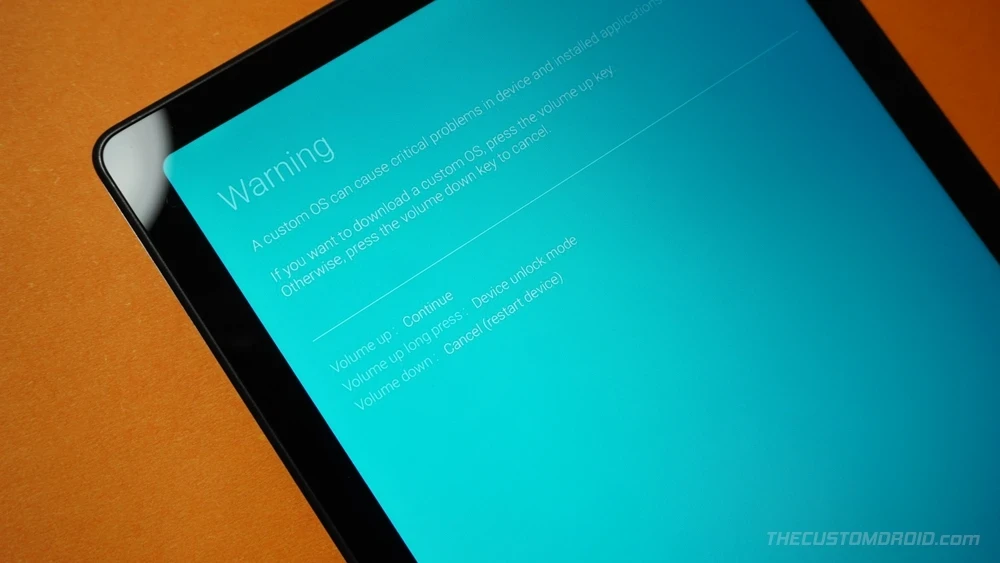
Windows only: install the drivers. A more complete set of instructions can be found in the ZAdiag user guide.
- Run
zadiag.exefrom the Drivers folder of the Heimdall suite. - Choose
Options » List alldevices from the menu. - Select device with USB ID
04E8 685Dfrom the drop down menu. - Click
Replace Driver(having to selectInstall Driverfrom the drop down list built into the - If you are prompted with a warning that the installer is unable to verify the publisher of the driver, select
Install this driver anyway. You may receive two more prompts about security. Select the options that allow you to carry on.
- Run
On the computer, open a command prompt (on Windows) or terminal (on Linux or macOS) window, and type:
heimdall print-pitIf the device reboots, Heimdall is installed and working properly.
Installing the /e/OS Recovery on your x1s
Download the /e/OS recovery (linked in the Download section above)
Power off the device and connect the USB adapter to the computer (but not to the device, yet).
Boot into download mode:
With the device powered off
hold Volume Down + Volume Up and connect the USB cable to PC.
Accept the disclaimer, then insert the USB cable into the device.
- On the computer, open a command prompt (on Windows) or terminal (on Linux or macOS) window in the directory the recovery image is located, and type:
heimdall flash --RECOVERY recoveryfilename.img --no-reboot
Replace
recoveryfilenamewith the name of the recovery you downloaded
A blue transfer bar will appear on the device showing the recovery being transferred.
Tip: The device will continue to displayDownloading... Do not turn off target!!even after the process is complete. When the status message in the top left of the device’s display reports that the process is complete, you may proceed.Manually reboot into recovery:
With the device powered off, Reboot and immediately hold Volume Up + Power while the device is connected to a PC via USB cable.
Note: Be sure to reboot into recovery immediately after having installed the custom recovery. Otherwise the custom recovery will be overwritten and the device will reboot (appearing as though your custom recovery failed to install).
Note: Be sure to reboot into recovery immediately after having installed the custom recovery. Otherwise the custom recovery will be overwritten and the device will reboot (appearing as though your custom recovery failed to install).
Steps to install /e/OS from recovery
Use Volume to navigate and Power to select — to go back to the main screen, use Volume Up to choose the arrow at the top. If your PC can’t detect the device over adb, tap Advanced » Enable adb from the /e/OS recovery main screen.
Format the device
On /e/OS Recovery main screen:
Select
Factory resetSelect
Format data / Factory resetoptionNext screen will display a warning that this action cannot be undone
Select
Format datato proceed orCancelif you want to go backIf you selected
Format data, the format process will completeYou’ll see text in small font on the lower left side of the screen showing format progress, similar to this:
Wiping data
Formatting/data
Formatting/cache
Data wipe complete
Display will now return to the Factory Reset screen
Install /e/OS
In /e/OS recovery main screen:
Select
Apply Updateand in next screenApply update from adbIn the next screen, the device is now in sideload mode
Note at this point the Cancel option is highlighted that does not mean you have canceled the action. The device is in adb sideload mode.
On your PC begin adb sideload. Type the below command in a console
adb sideload downloaded_file_name.zipReplace downloaded_file_name.zip with the name of the /e/OS file you downloaded in the previous section
Press
enterkey on the keyboard to start the sideloading The screen will show the progress percentage…This might pause at 47%Give it some time
The PC console will now display
Total xfer: 1.00xThe phone screen will now display some text with a message similar to:
Script succeeded result was [1.000000]This means that the install was successful.
Reboot the device
In /e/OS recovery main screen:
- Select
Reboot system nowThe reboot process may take 5 - 10 minutes
To find some troubleshooting tips… click here
adb
- Getting a
Total xFer ':' 0.01xmessage - Try to upload the /e/OS to internal storage and retry to install adb ':' sideload connection failed ':' insufficient permissions for deviceerror - Try to execute the commandsadb kill-serverandadb start-serverand retry- Getting an
insufficient permissionserror - Try the solution given here - When running "adb devices" in bash a device is shown as "unauthorized" - Try the solution given here
Connectivity
- Trying to troubleshoot mobile connectivity issues - Read this guide
Please share your experience , suggest tips or changes to this install guide documentation by visiting the Galaxy S20 /S20 5G specific topic on our community forum. To report issues in /e/OS please refer this guide