
Hacer una copia de seguridad de mis archivos después de la caída de Murena Workspace
EditThe Recovery Process
After the Murena Workspace recovery process begins, your missing online entries and data will gradually reappear. Here’s what to expect:
- Files entry This will be the first entry to return, in a first time without any data
- Other entries Entries like Notes and Gallery will reappear progressively.
- Data Recovery Your recovered data will be placed in a folder named
MurenaRecoveryin the Files entry. Please note this folder is not yet available and will not reappear at the same time for all users. Once you see it in the Files app, please check thoroughly as some files may be missing or empty. Moreover as your recovered files are in a new dedicated folder the file sharings you may have set prior to the outage will not be effective: you need to set them again if you want them to work.
ThisMurenaRecoveryfolder will contain the most recent data we were able to recover for your account.
Murena Workspace will block requests coming from the following Nextcloud clients
- Carnet
- EasySync
- eDrive (only for /e/OS before 1.1.13)
- /e/OS Notes
- Nextcloud App (Windows, macOS, Linux, Android, iOS)
- Nextcloud Notes
Murena Workspace bloqueará las solicitudes provenientes de los siguientes clientes de Nextcloud:
- Aplicación Nextcloud (Windows, macOS, Linux, Android, iOS)
- Carnet
- EasySync
- eDrive (solo para /e/OS antes de 1.13)
- Notas /e/OS
- Notas Nextcloud
La razón detrás de esto es que estas aplicaciones podrían eliminar algunos archivos cuando reabramos, ya que el cliente detectará una diferencia entre lo que está presente localmente y lo que está presente en Murena Workspace. Al bloquear estas solicitudes, damos tiempo a cada usuario para respaldar sus archivos locales. La siguiente documentación explica, cliente por cliente, cómo puedes respaldar tus archivos como usuario.
Respalda tus datos locales
First, you have to check if eDrive is running on your device. Go to Settings > Accounts > your Murena Workspace email address > Account sync. If Pictures and videos is disabled, it means eDrive is not running and that you can ignore this part.
If you are running /e/OS below 1.13 (how do I check my /e/OS version?):
- Please upgrade to the latest /e/OS version (
Settings>Updates) - OR if you can’t upgrade, copy the /e/OS device data from the following folder to another device
- DCIM
- Documents
- Movies
- Music
- Pictures
- Podcasts
- Recordings
- Ringtones
If you are running /e/OS 1.13 and later, nothing to do! eDrive never deletes files, so no need to worry about data loss. File sync will be enabled from the beginning with this version.
Note: By default, eDrive will not push again all the local files you have on your smartphone. An upcoming eDrive update will fix this behavior, and force push on Murena Workspace the files you have on your device.
Nextcloud App (Android, iOS, Linux, macOS, Windows)
Aplicación Nextcloud (Android, iOS, Linux, macOS, Windows)
Nextcloud eliminará archivos que estaban presentes localmente pero no en el servidor. De manera predeterminada, las aplicaciones Nextcloud no se sincronizarán cuando reabramos la aplicación Archivos de Murena Workspace. Copia tus archivos a otra ubicación.
Windows, macOS and Linux
In order to back up:
- Open the Nextcloud App: Launch the Nextcloud app on every device it is installed on
- Access Local Folder: Click on “Open Local Folder” to view your synced files.
- Select Files
- macOS Use
Cmd (⌘) + Ato select all files, then copy them usingCmd (⌘) + C - Windows/Linux Use
Ctrl + Ato select all files, then copy them usingCtrl + C
- macOS Use
- Create a back up Folder: Create a new folder (e.g.,
Nextcloud-Backup) in a safe location. - Paste Files
- macOS Paste the copied files into the back-up folder using
Cmd (⌘) + V - Windows/Linux Paste the copied files into the back-up folder using
Ctrl + V
- macOS Paste the copied files into the back-up folder using
Android
-
Abre la aplicación
Archivosy haz clic en el botón Nextcloud en el panel lateral (si no vez este ícono, ve al paso 9).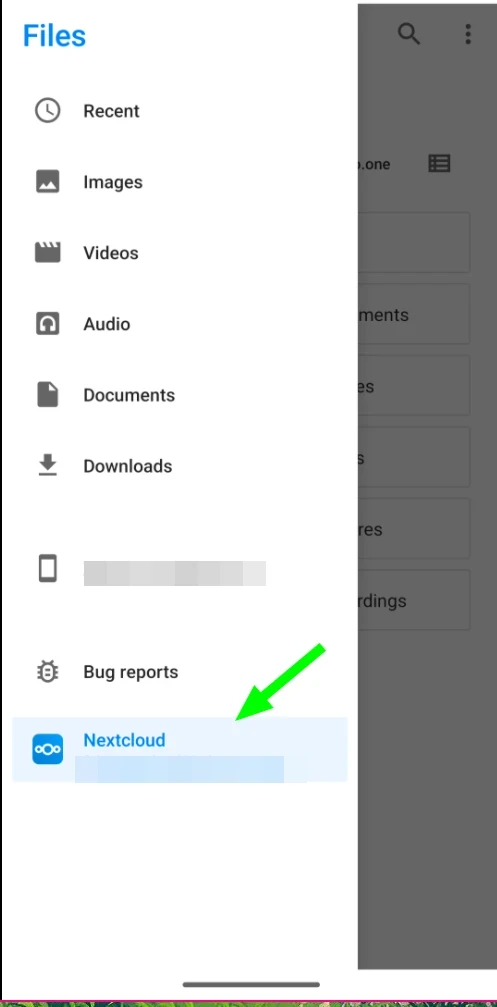
-
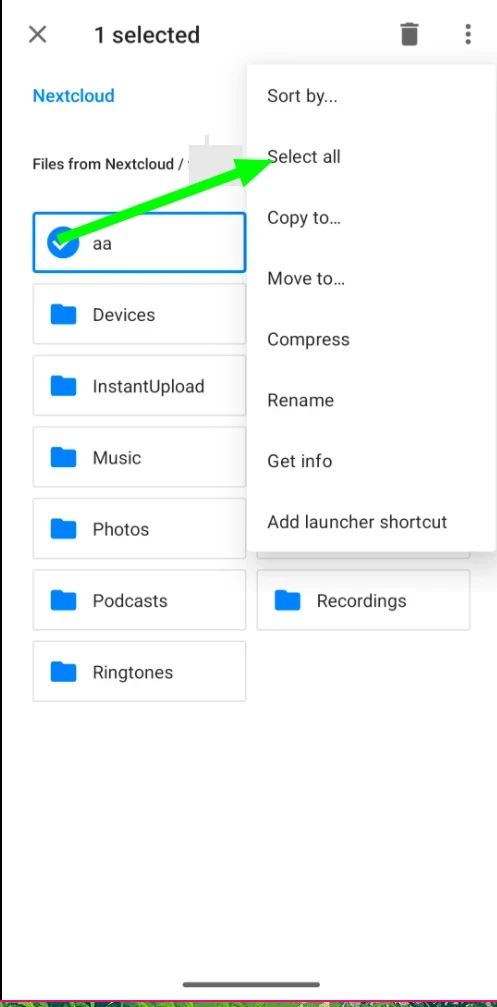
Ahora mantén presionado cualquier elemento, lo seleccionará, haz clic en el menú de tres puntos (⋮) en la esquina superior derecha y presiona seleccionar todo.
-
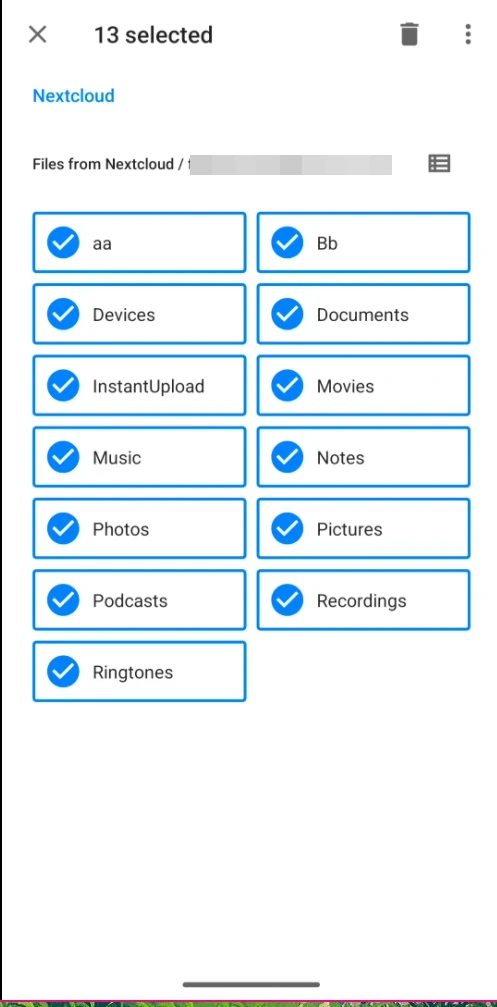
Esto seleccionará todos los archivos restantes.
-
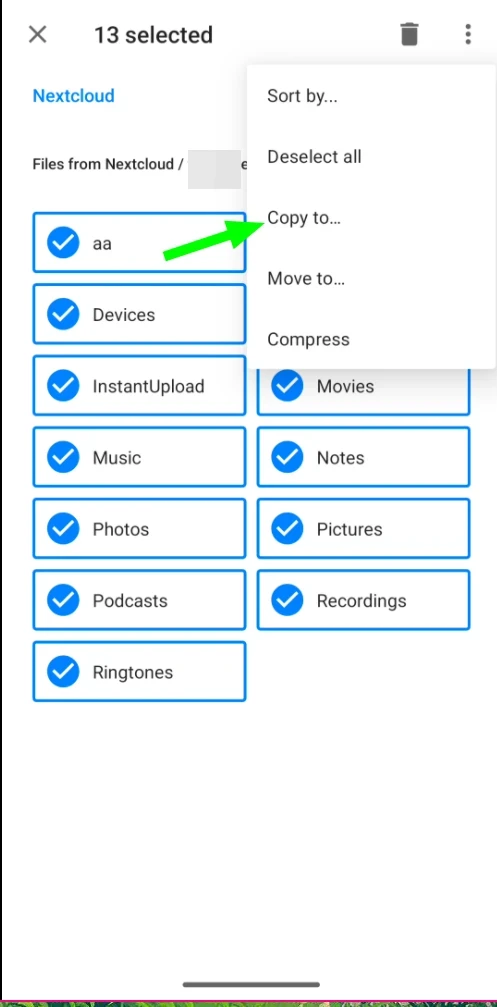
Ahora haz clic en el menú de tres puntos (⋮) en la esquina superior derecha y haz clic en copiar a….
-
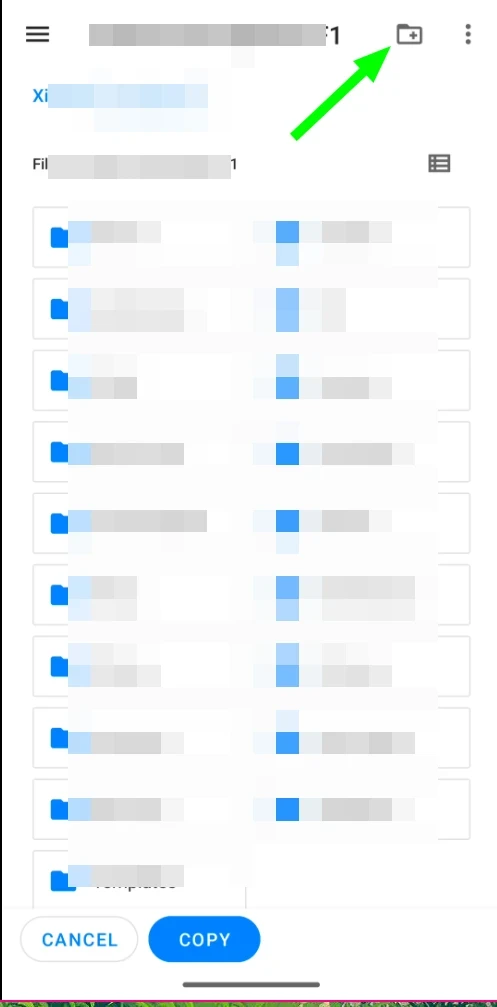
Esto te llevará a una página en la carpeta raíz del dispositivo. Haz clic en el botón agregar carpeta para crear una nueva carpeta.
-
Te pedirá el nombre de la carpeta, en nuestro caso la llamamos
Nextcloud.bak.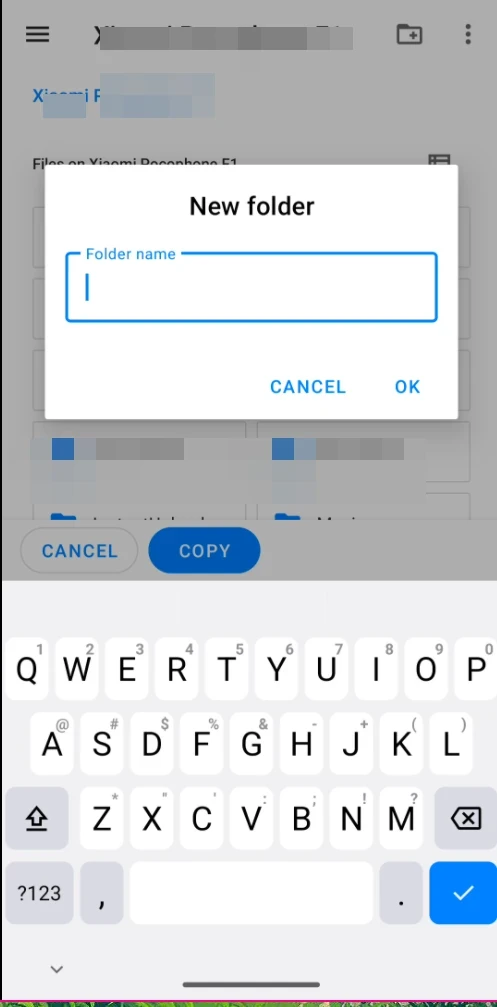
-
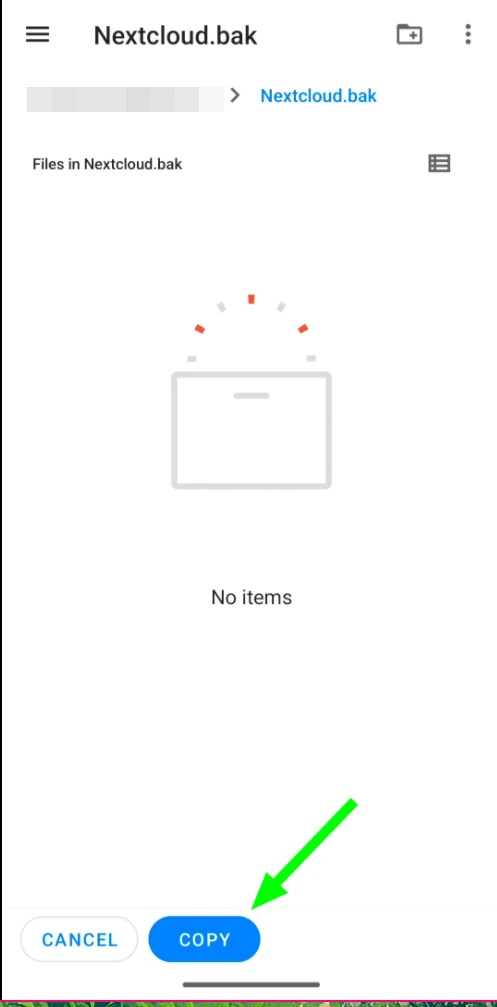
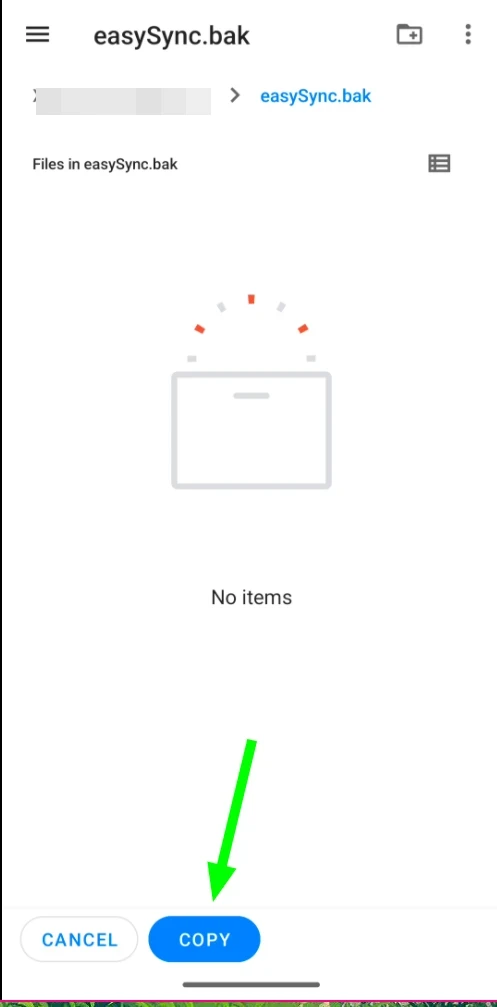
Ahora abre la carpeta recién creada y presiona el botón copiar en la parte inferior de la pantalla. Esto iniciará el proceso de copia.
-
Es posible que veas una notificación si el tamaño de la copia es grande.
-
You might see a notification going on if the copy size is bigger.
Success: Tu proceso de respaldo está completo. En cualquier caso, si falló en el paso 1, haz lo siguiente: -
Abre la aplicación
Nextcloud, seleccionaConfiguracióndesde el panel izquierdo.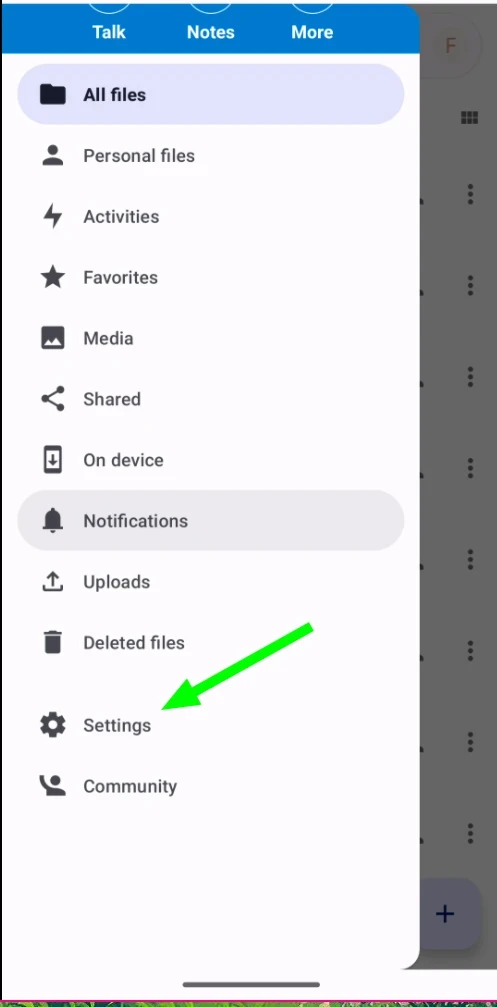
-
Haz clic en la opción
Carpeta de almacenamiento de datos, esto abrirá un popup. Toma nota del elemento seleccionado en el popup.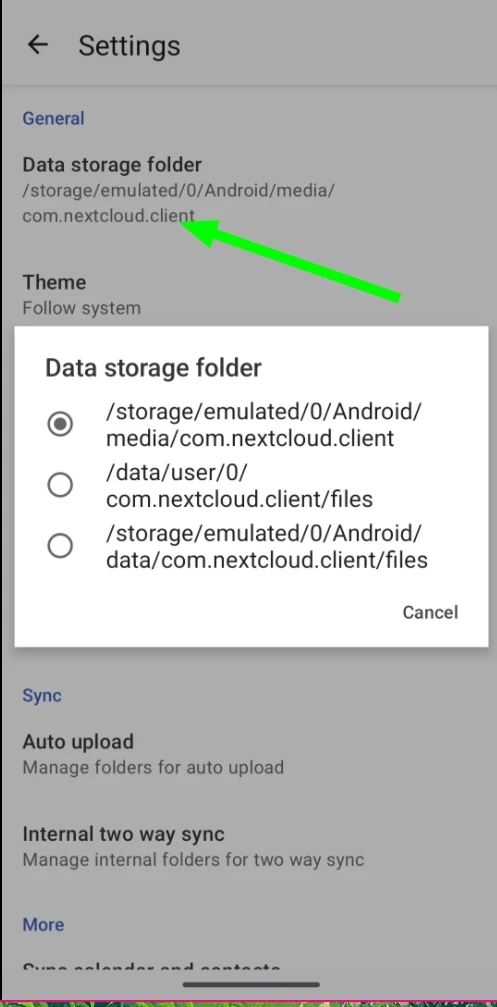
-
Abre la aplicación
Archivosy navega hasta la ruta anotada en precedencia (por defecto debería ser:Android/media/com.nextcloud.client). Aquí encontrarás una carpeta llamadanextcloud. Manténla presionada para seleccionarla.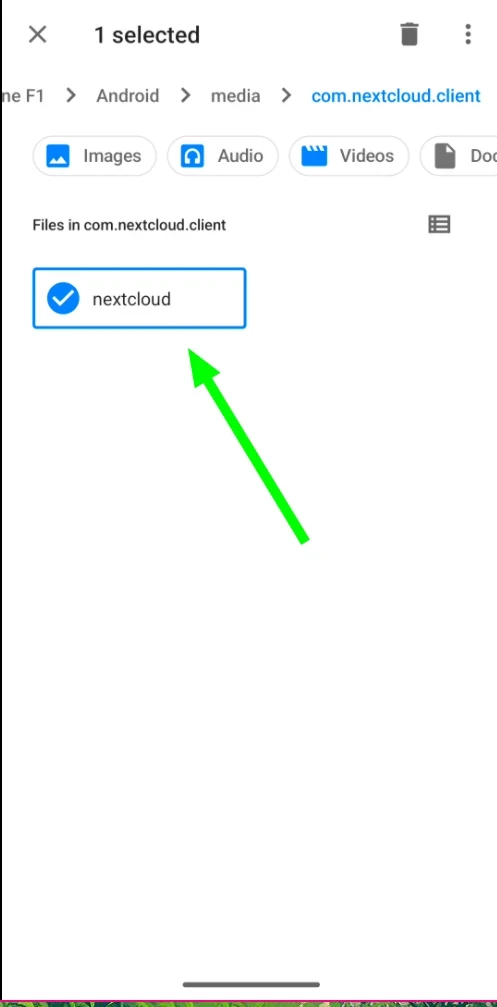
-
Ahora sigue los pasos 4 al 8 para completar el proceso de respaldo.
-
Now follow step 4 to step 8 to complete the backup process.
iOS
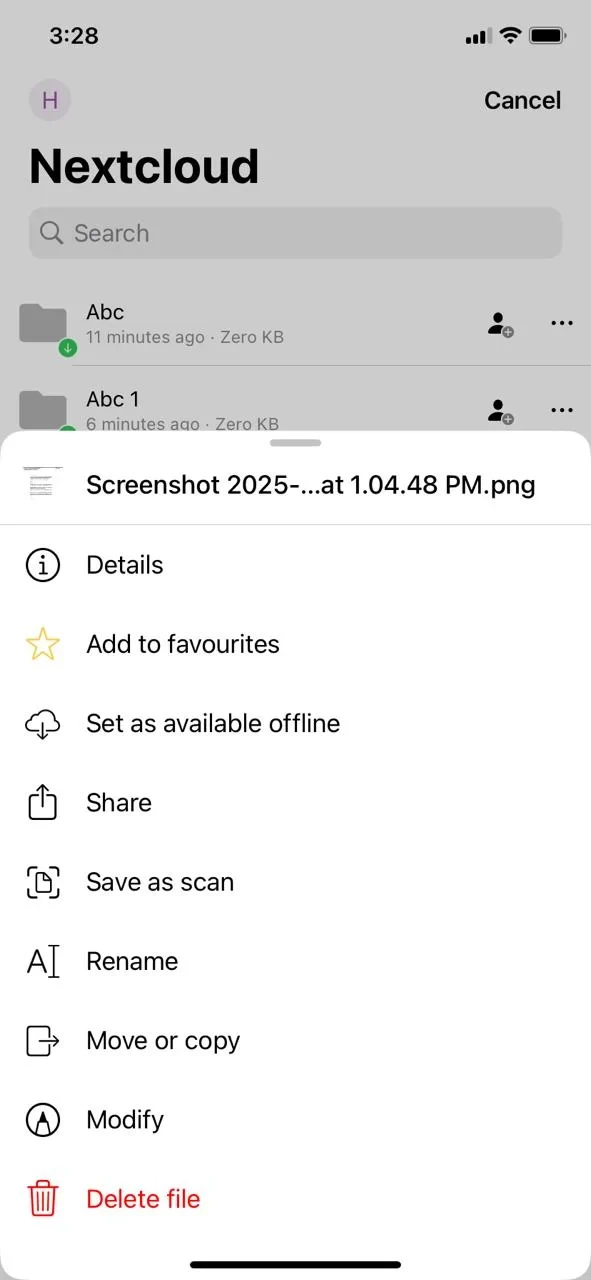
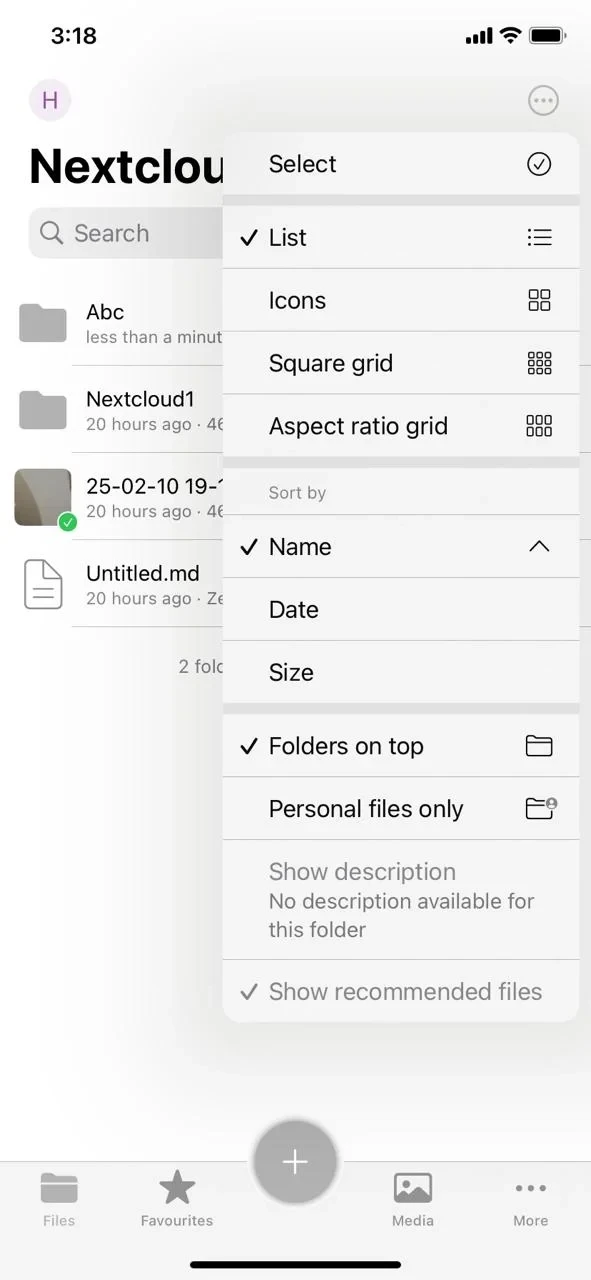{: height="400"} 4. **Selecciona "Establecer como disponible sin conexión"** para descargar los archivos para acceso sin conexión.
{: height="400"} 5. **Abre la aplicación Archivos** en tu iPhone.
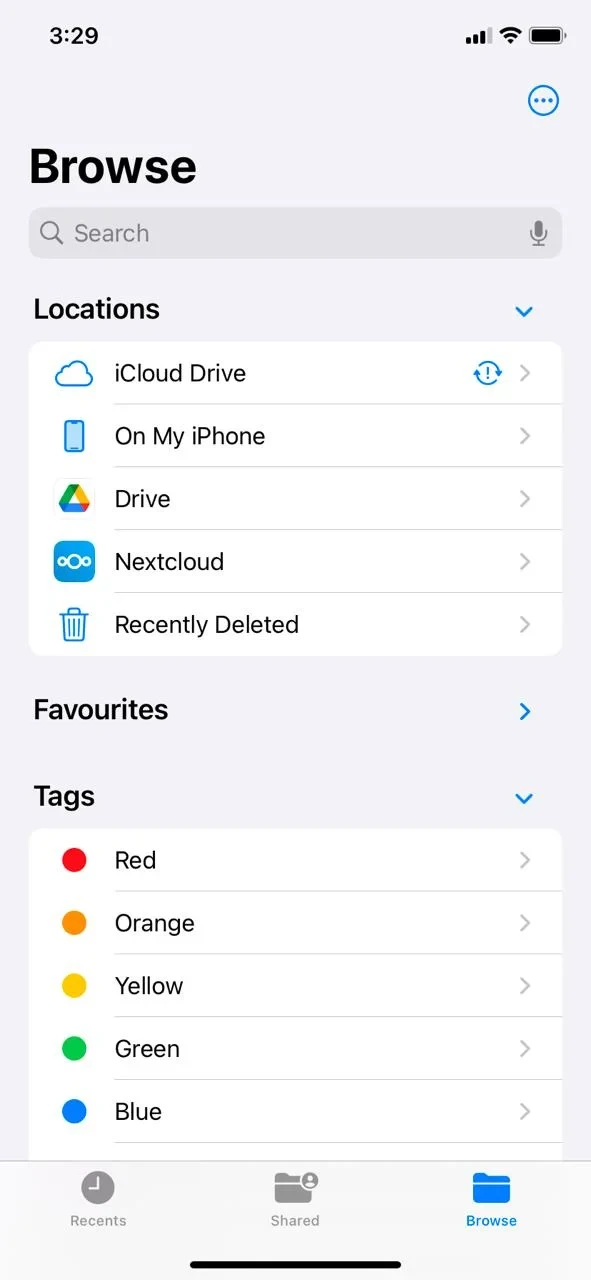
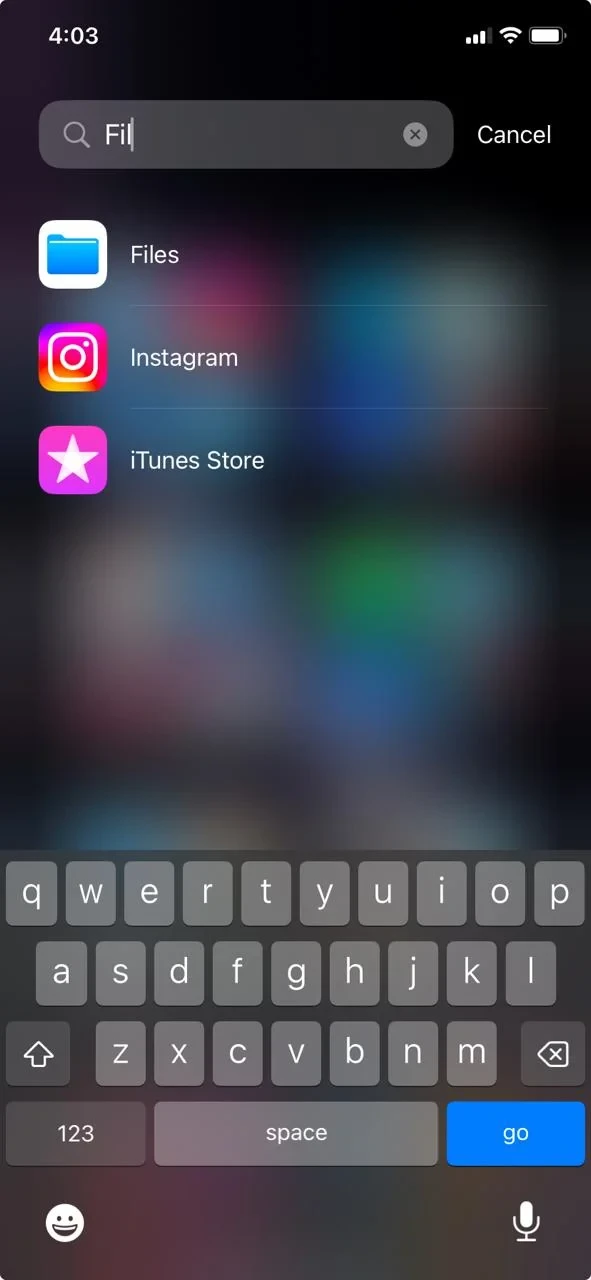{: height="400"} 6. **Ve a "En mi iPhone"** o **"iCloud Drive"** bajo **Ubicaciones**.
{: height="400" } 6. **Go to "On My iPhone"** or **"iCloud Drive"** under **Locations**.
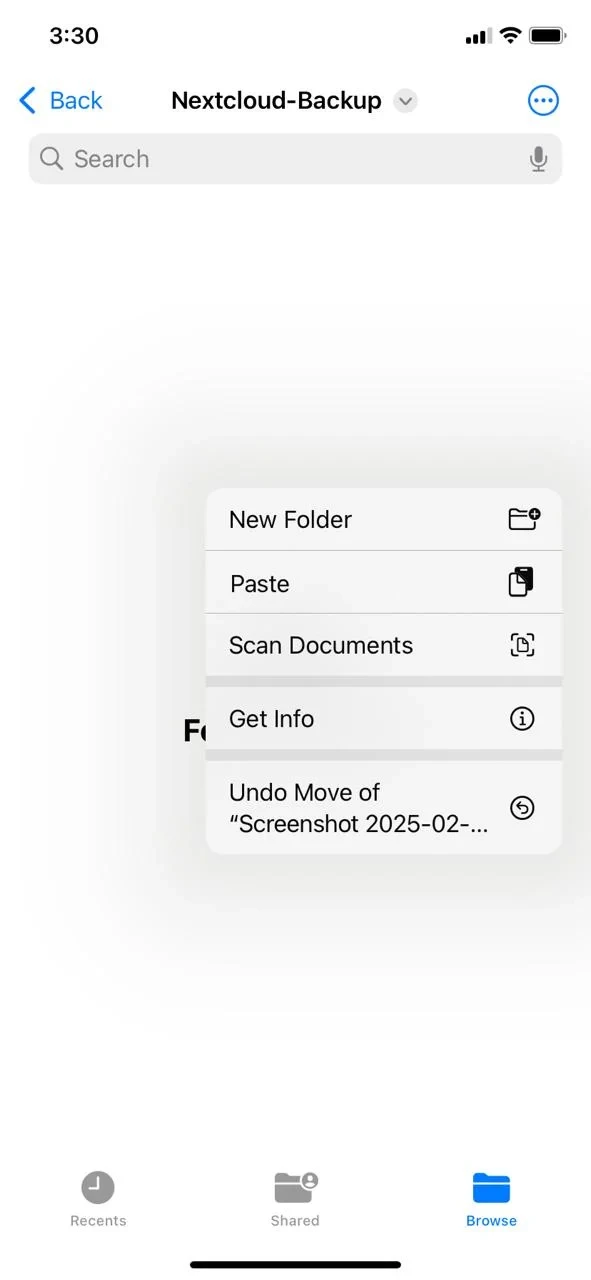
{: height="400" } 7. **Tap the three-dot menu (⋮)** in the top-right corner and select **"New Folder"**. 8. **Name the folder** (e.g., `Nextcloud-Backup`).
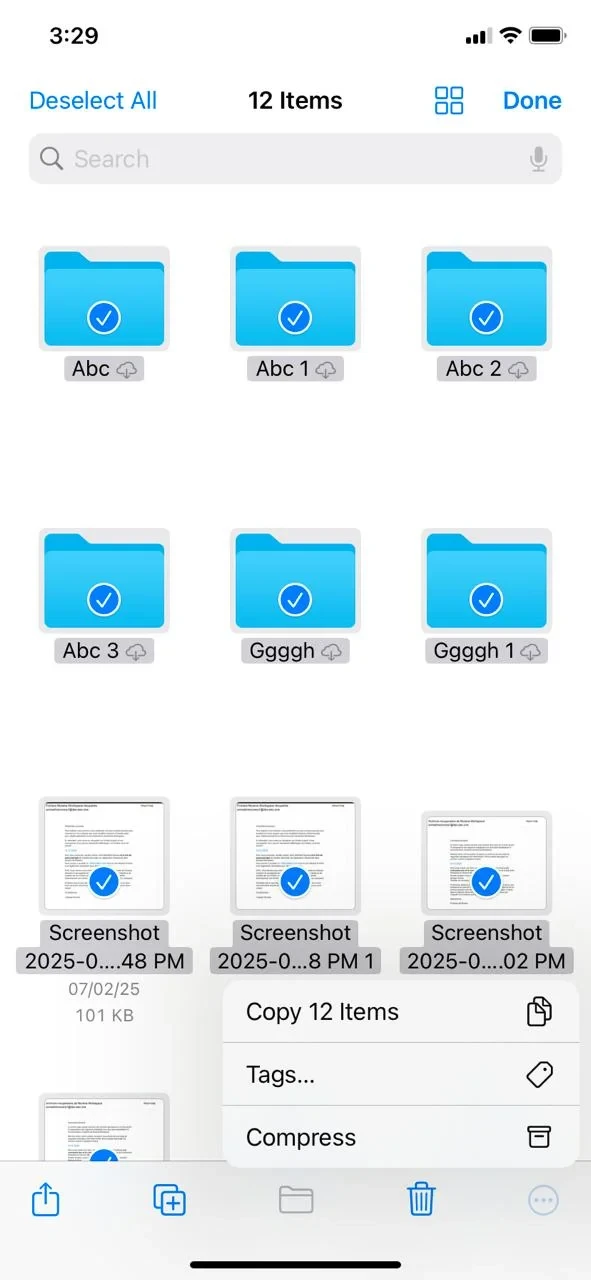
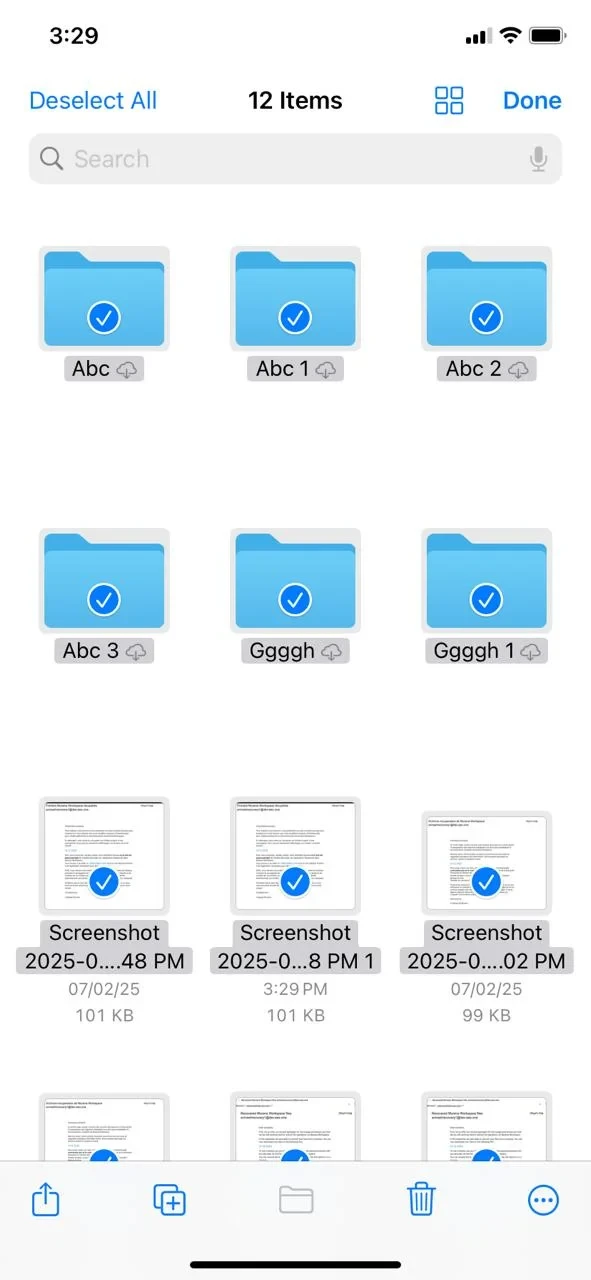{: height="400"} 13. **Toca el menú de tres puntos (⋮)** en la parte inferior y elije **"Copiar"**.
{: height="400" } 13. **Tap the three-dot menu (⋮)** at the bottom and choose **"Copy"**.
{: height="400" } 14. **Navigate to the "Nextcloud-Backup" Folder**. 15. **Long press inside the folder**, then tap **"Paste"** to copy the files.
{: height="400" }
EasySync
-
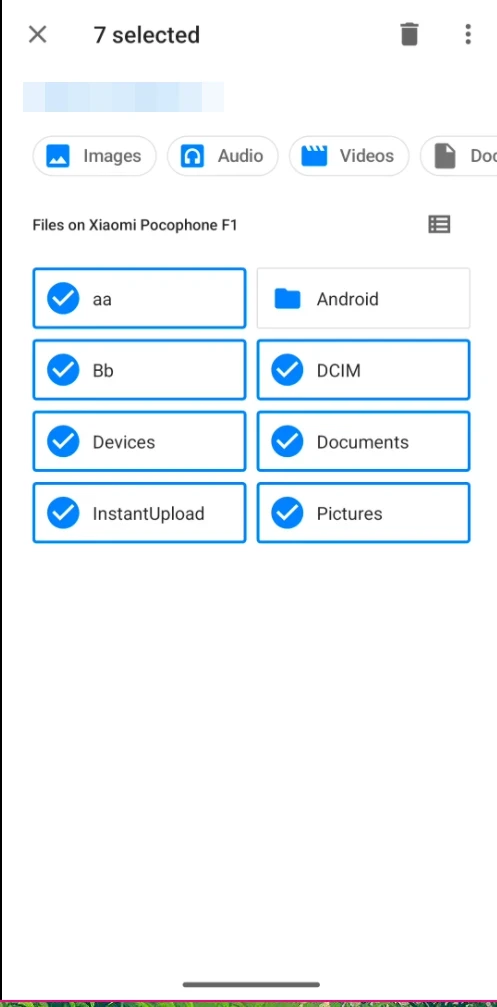
Ahora haz clic en el botón de tres puntos (⋮) en la esquina superior derecha y haz clic en copiar a….
-
Open
Filesapp & long prese items which you want to make backup -
Now click the 3 dot button (⋮) from top-right corner & click copy to…
Notas /e/OS
La aplicación Notas /e/OS eliminará las notas que estaban presentes en el dispositivo pero no en el servidor. La entrada de Notas de Murena Workspace está actualmente deshabilitada para evitar este comportamiento. Para respaldar tus notas:
{: height="400" }
- A corto plazo: usa el botón Compartir
- Abre las notas una por una
- Usa el botón compartir para exportar cada nota
The /e/OS Notes app will delete the notes that were existing on the device but not on the server. To back up your notes:
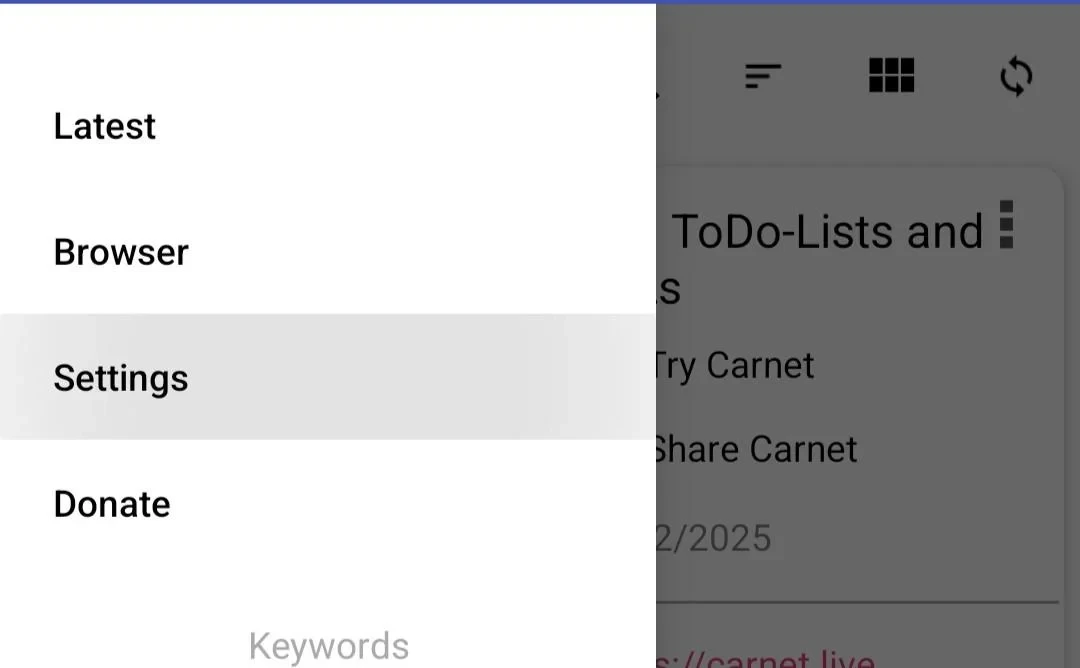
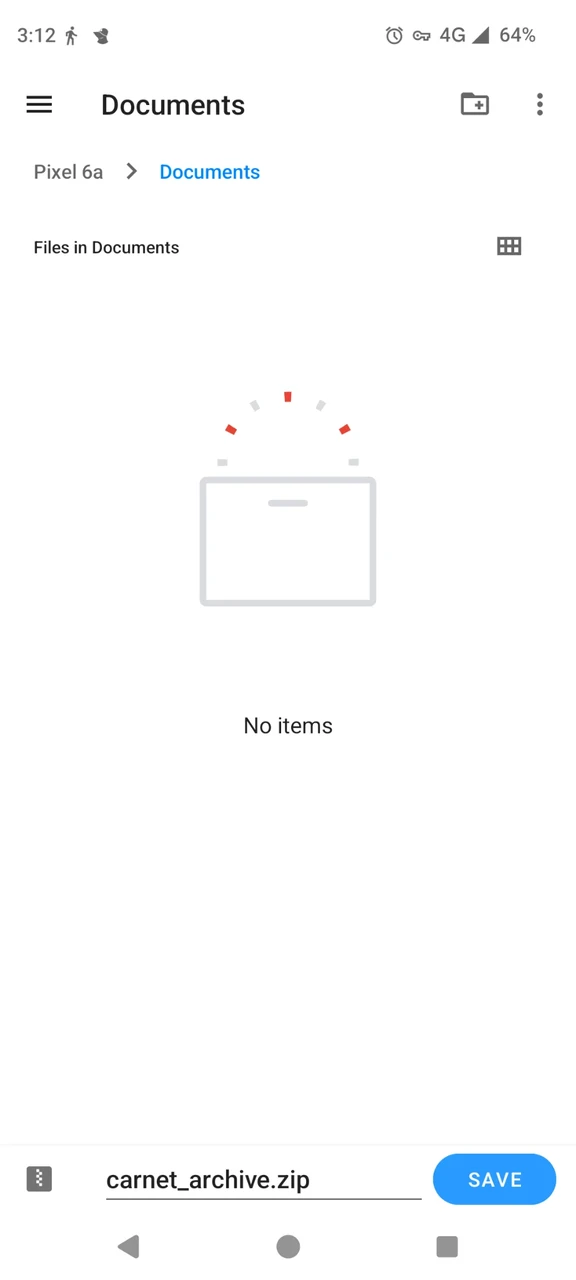{: height="400" } 1. Crea el respaldo - Usa el menú de tres líneas (☰) en la parte superior izquierda - Selecciona el botón *Configuración*
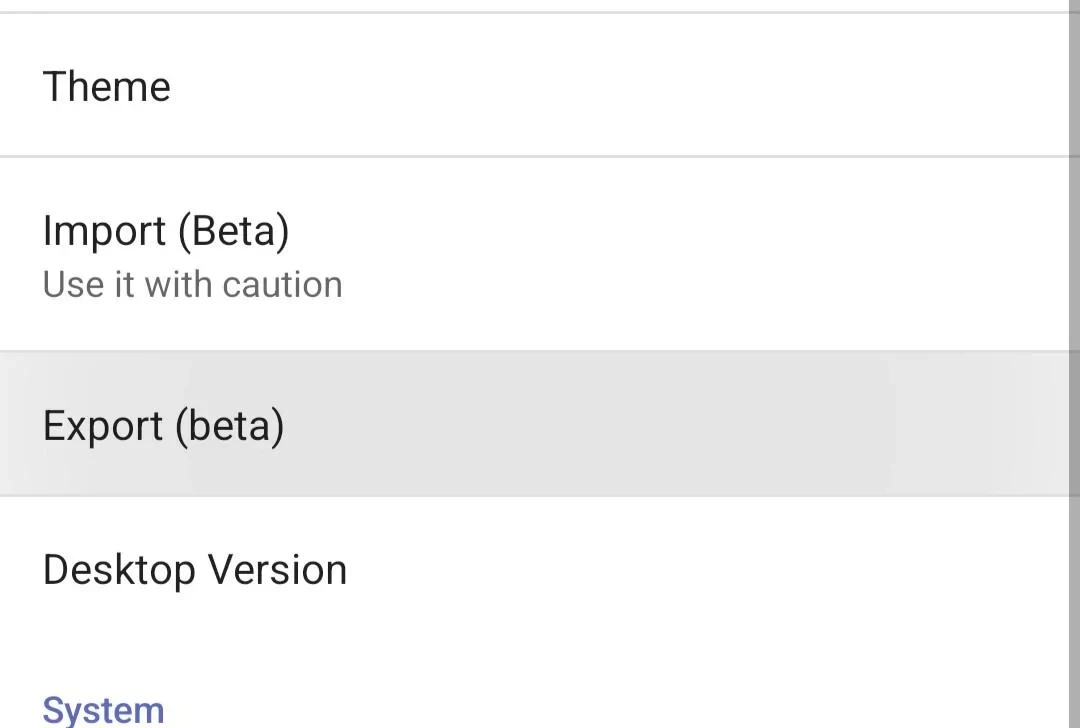
{: height="400" } - Usa el botón *Exportar*
{: height="400" } - Ve a la carpeta que deseas usar para el respaldo y presiona el botón *Guardar* en la esquina inferior derecha
{: height="400" }
- Create the backup
- Use the three-line menu (☰) at the top left
-
Select the Settings button

-
Use the Export button

-
Go to the folder you want to use for back-up, and press the Save button at the bottom right

- Check the back-up
- Open the Files app
- Browse to the previously selected folder
- Open
carnet_archive.zip - You should be able to
.sqdfiles corresponding to your notes as well as folders if you had any
Client Synchronization
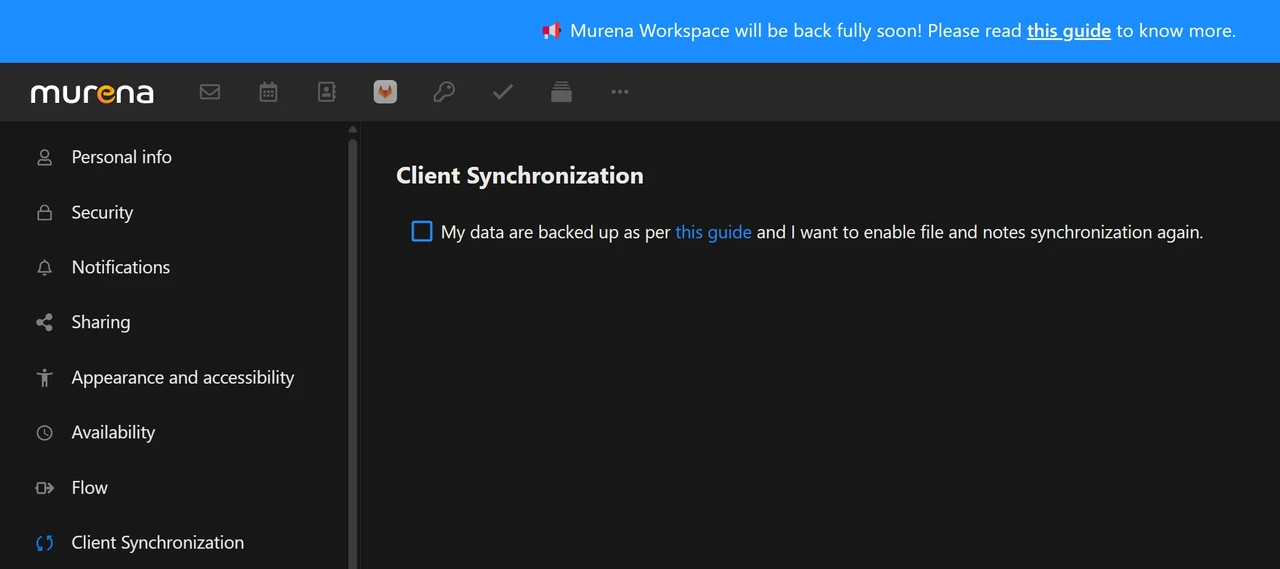
A new setting called Client Synchronization has been added to Murena Workspace’s Settings to enable synchronization for all 3rd party clients listed above and more.
For New users this setting is enabled by default but existing users need to enable it from here.
FAQ Section
Why is sync disabled?
- Sync is disabled to prevent data loss during the recovery process.
When can I re-enable sync?
- If you’re on /e/OS 2.9 or newest, synchronization is working without any action from your side.
- If you’re on an oldest version, you can re-enable sync as soon as you have backed-up all your data on your phone by ticking the checkbox in the Client Synchronization entry of your Murena Workspace settings.
Will the size of the MurenaRecovery folder impact my storage space?
- No, the
MurenaRecoveryfolder is not included in the calculation of your used storage space.
For how long will the MurenaRecovery folder be visible for users ?
- We currently have not set an end date. However, we plan to keep it available for at least a few months. We strongly recommend that users download their data from the
MurenaRecoveryfolder and save it to a secure location of their choice as soon as possible.
I am not able to see the MurenaRecovery folder yet. What should I do?
- We’re gradually rolling out the
MurenaRecoveryfolder, starting with Premium users. This process will take some time. Please wait until the end of June before contacting us, time for the rollout to complete.
How do I contact you if I am not able to see the MurenaRecovery folder at the end of June?
- Paying users can use the contact form to share details with the Helpdesk.
- Free account users can contact us by creating a post on the Forum.