
Esegui il backup dei miei file dopo l'interruzione di Murena Workspace
EditThe Recovery Process
After the Murena Workspace recovery process begins, your missing online entries and data will gradually reappear. Here’s what to expect:
- Files entry This will be the first entry to return, in a first time without any data
- Other entries Entries like Notes and Gallery will reappear progressively.
- Data Recovery Your recovered data will be placed in a folder named
MurenaRecoveryin the Files entry. Please note this folder is not yet available and will not reappear at the same time for all users. Once you see it in the Files app, please check thoroughly as some files may be missing or empty. Moreover as your recovered files are in a new dedicated folder the file sharings you may have set prior to the outage will not be effective: you need to set them again if you want them to work.
ThisMurenaRecoveryfolder will contain the most recent data we were able to recover for your account.
Murena Workspace will block requests coming from the following Nextcloud clients
- Carnet
- EasySync
- eDrive (only for /e/OS before 1.1.13)
- /e/OS Notes
- Nextcloud App (Windows, macOS, Linux, Android, iOS)
- Nextcloud Notes
Murena Workspace bloccherà le richieste provenienti dai seguenti client Nextcloud:
- App Nextcloud (Windows, macOS, Linux, Android, iOS)
- Carnet
- EasySync
- eDrive (solo per /e/OS prima di 1.13)
- Note /e/OS
- Note Nextcloud
Il motivo di questa scelta è che queste app potrebbero eliminare alcuni file quando riapriremo, poiché il client rileverà una differenza tra ciò che è presente localmente e ciò che è presente su Murena Workspace. Bloccando le richieste, diamo tempo a ciascun utente di eseguire il backup dei propri file locali. La documentazione seguente spiega, client per client, come puoi eseguire il backup dei tuoi file come utente.
Esegui il backup dei tuoi dati locali
First, you have to check if eDrive is running on your device. Go to Settings > Accounts > your Murena Workspace email address > Account sync. If Pictures and videos is disabled, it means eDrive is not running and that you can ignore this part.
If you are running /e/OS below 1.13 (how do I check my /e/OS version?):
- Please upgrade to the latest /e/OS version (
Settings>Updates) - OR if you can’t upgrade, copy the /e/OS device data from the following folder to another device
- DCIM
- Documents
- Movies
- Music
- Pictures
- Podcasts
- Recordings
- Ringtones
If you are running /e/OS 1.13 and later, nothing to do! eDrive never deletes files, so no need to worry about data loss. File sync will be enabled from the beginning with this version.
Note: By default, eDrive will not push again all the local files you have on your smartphone. An upcoming eDrive update will fix this behavior, and force push on Murena Workspace the files you have on your device.
Nextcloud App (Android, iOS, Linux, macOS, Windows)
App Nextcloud (Android, iOS, Linux, macOS, Windows)
Nextcloud eliminerà i file che erano presenti localmente ma non più sul server. Per impostazione predefinita, le app Nextcloud non si sincronizzeranno quando riapriremo l’app File di Murena Workspace. Copia i tuoi file in un’altra posizione.
Windows, macOS and Linux
In order to back up:
- Open the Nextcloud App: Launch the Nextcloud app on every device it is installed on
- Access Local Folder: Click on “Open Local Folder” to view your synced files.
- Select Files
- macOS Use
Cmd (⌘) + Ato select all files, then copy them usingCmd (⌘) + C - Windows/Linux Use
Ctrl + Ato select all files, then copy them usingCtrl + C
- macOS Use
- Create a back up Folder: Create a new folder (e.g.,
Nextcloud-Backup) in a safe location. - Paste Files
- macOS Paste the copied files into the back-up folder using
Cmd (⌘) + V - Windows/Linux Paste the copied files into the back-up folder using
Ctrl + V
- macOS Paste the copied files into the back-up folder using
Android
-
Apri l’app
Filee fai clic sul pulsante Nextcloud nel pannello laterale (se non vedi questo icona, vai al passaggio 9).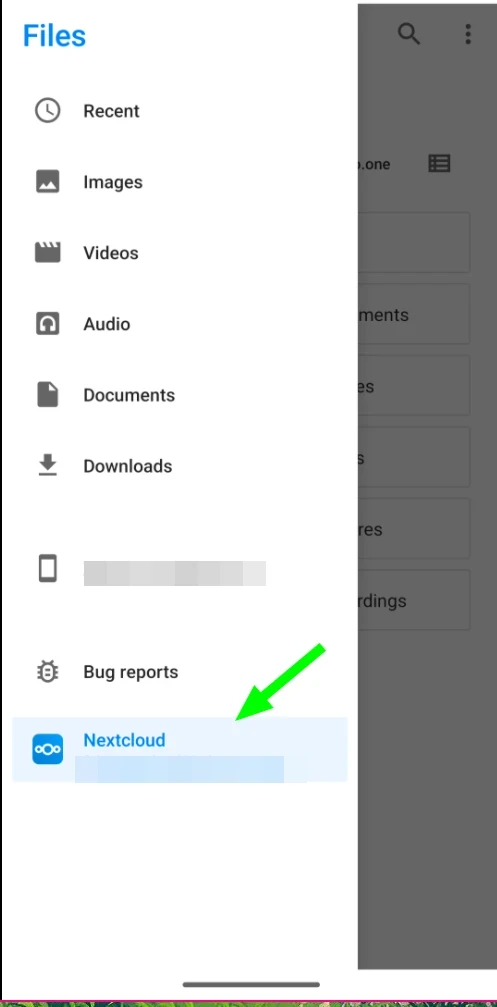
-
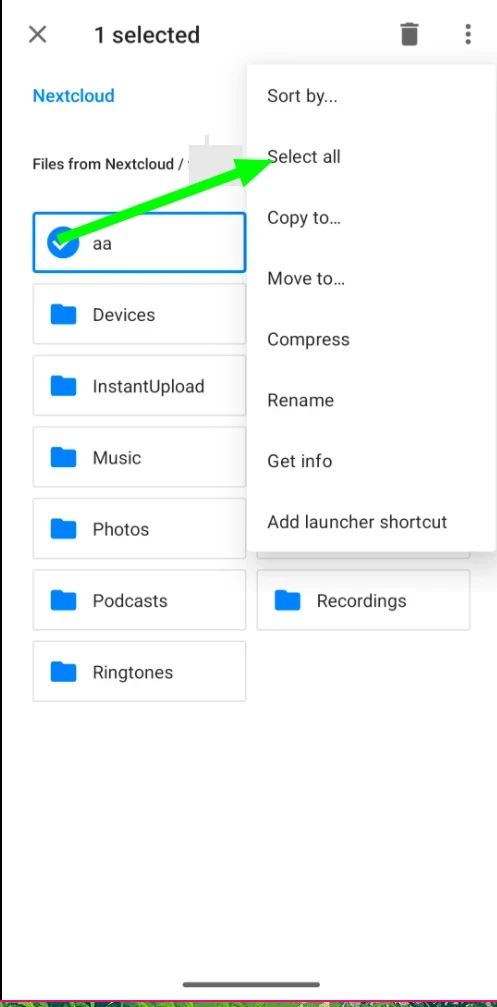
Ora mantieni premuto un elemento, selezionerà l’elemento, fai clic sull’icona tre punti (⋮) in alto a destra e premi seleziona tutto.
-
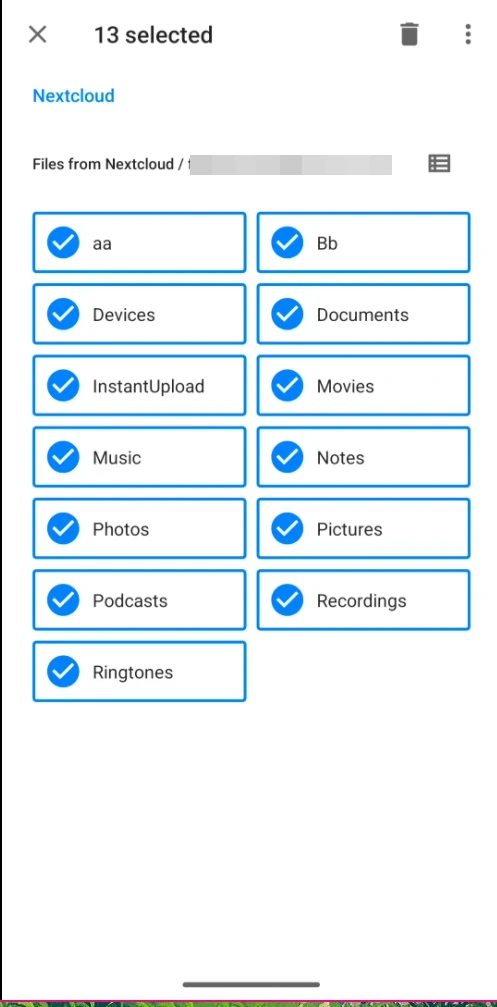
Selezionerà tutti i file rimanenti.
-
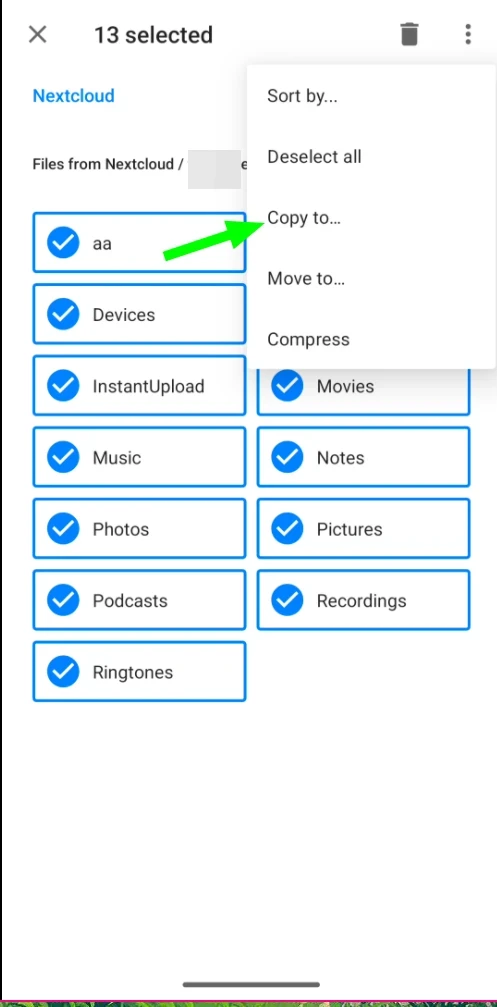
Ora fai clic sul pulsante tre punti (⋮) in alto a destra e fai clic su copia in….
-
Ti porterà a una pagina diretta alla cartella principale del dispositivo. Fai clic sul pulsante aggiungi cartella per creare una nuova cartella.
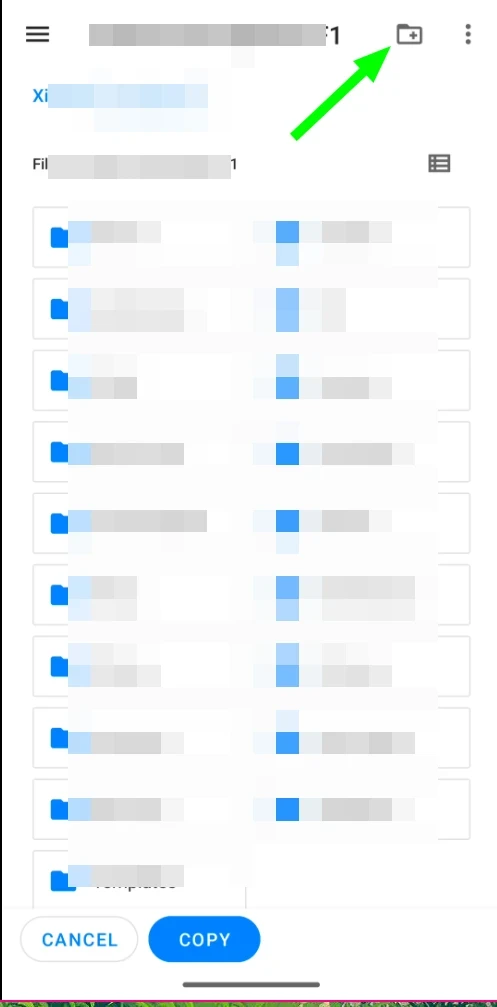
-
Ti chiederà il nome della cartella, nel nostro caso l’abbiamo chiamata
Nextcloud.bak.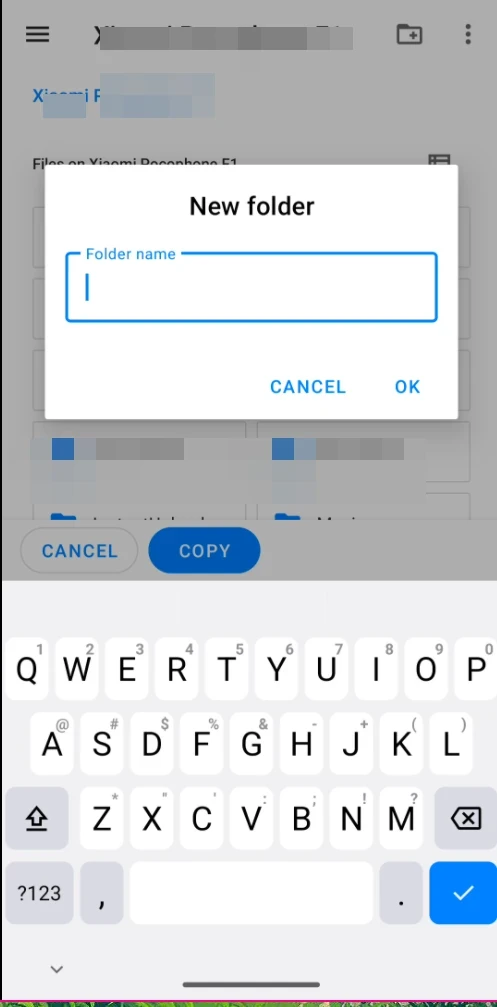
-
Ora apri la nuova cartella creata e premi il pulsante copia in basso. Questo avvierà il processo di copia.
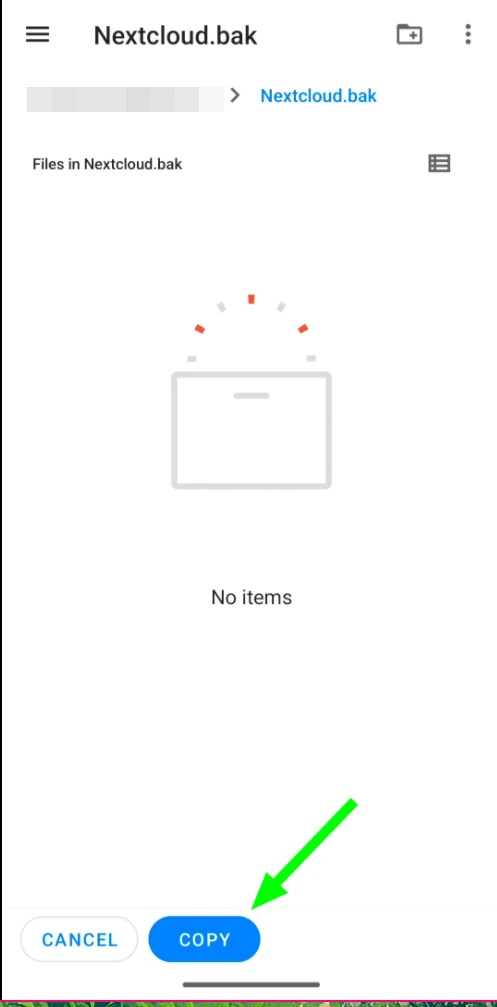
-
Potresti vedere una notifica se la dimensione della copia è grande.
-
You might see a notification going on if the copy size is bigger.
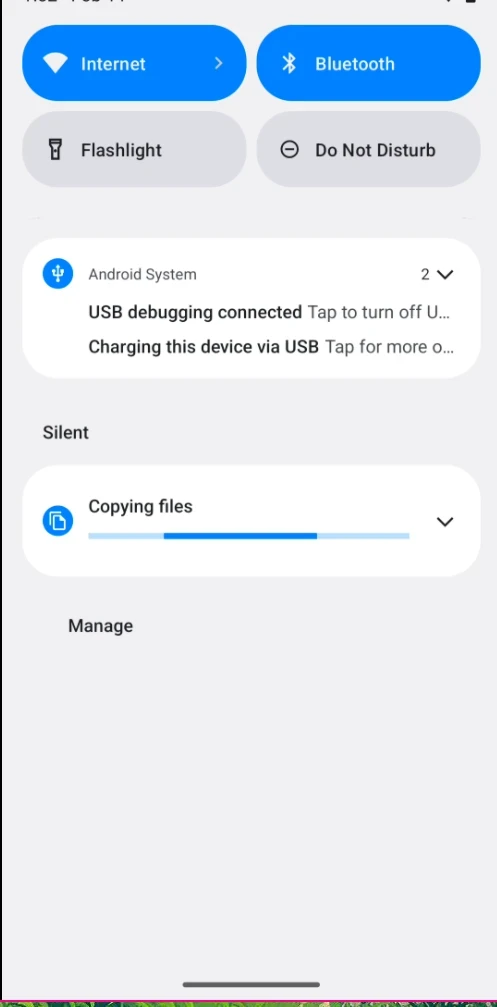 Success: Your backup process is done. In any case, if you failed on step-1, please follow below:
 -
Open
Nextcloudapp, selectSettingsfrom left side panel.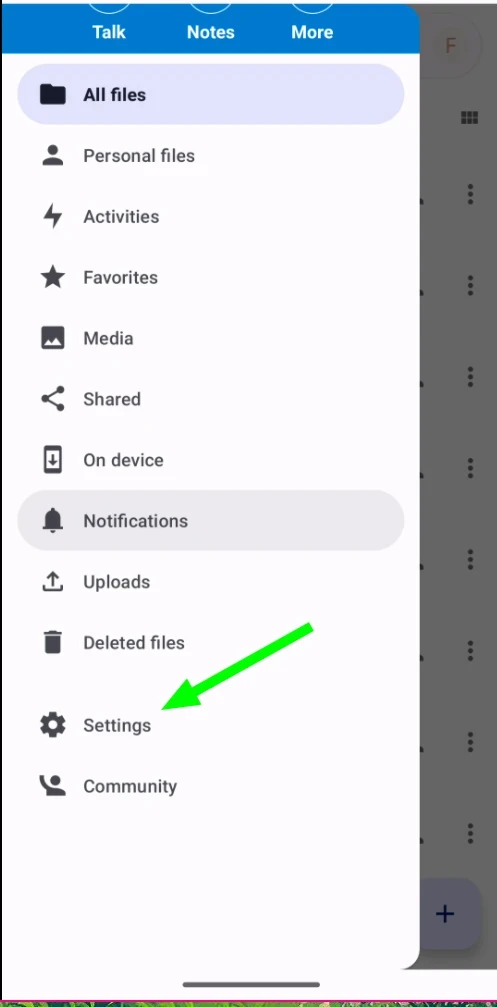
-
Click on the
Data storage folderoption, it will open a popup. Note down the selected item on the popup.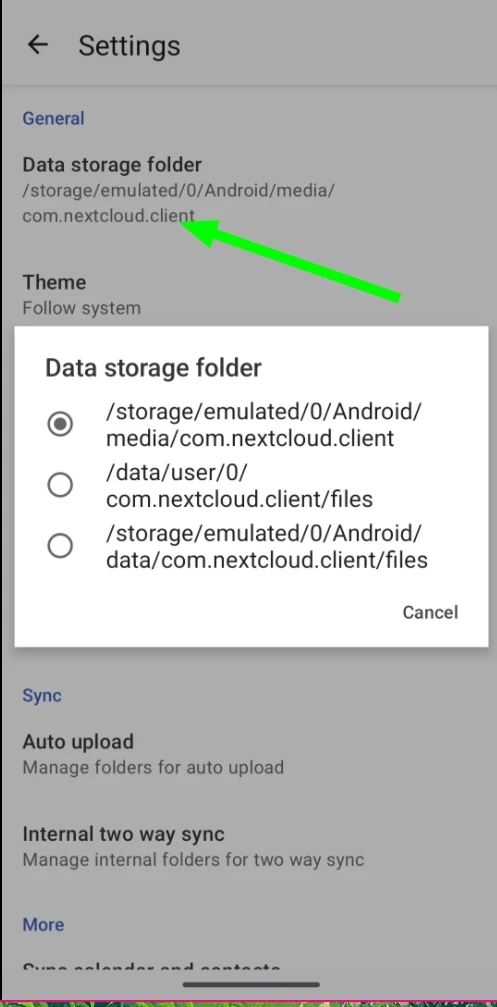
-
Open the
filesapp & navigate to the previously noted path (by default it should be:Android/media/com.nextcloud.client). Here you will find a folder namednextcloud. Long press to select it.
iOS
iOS
- Open the Nextcloud App on your iPhone or iPad.
- Navigate to the Files/Folders you want to back up.
-
Tap the three-dot menu (⋮) next to the file or folder name.
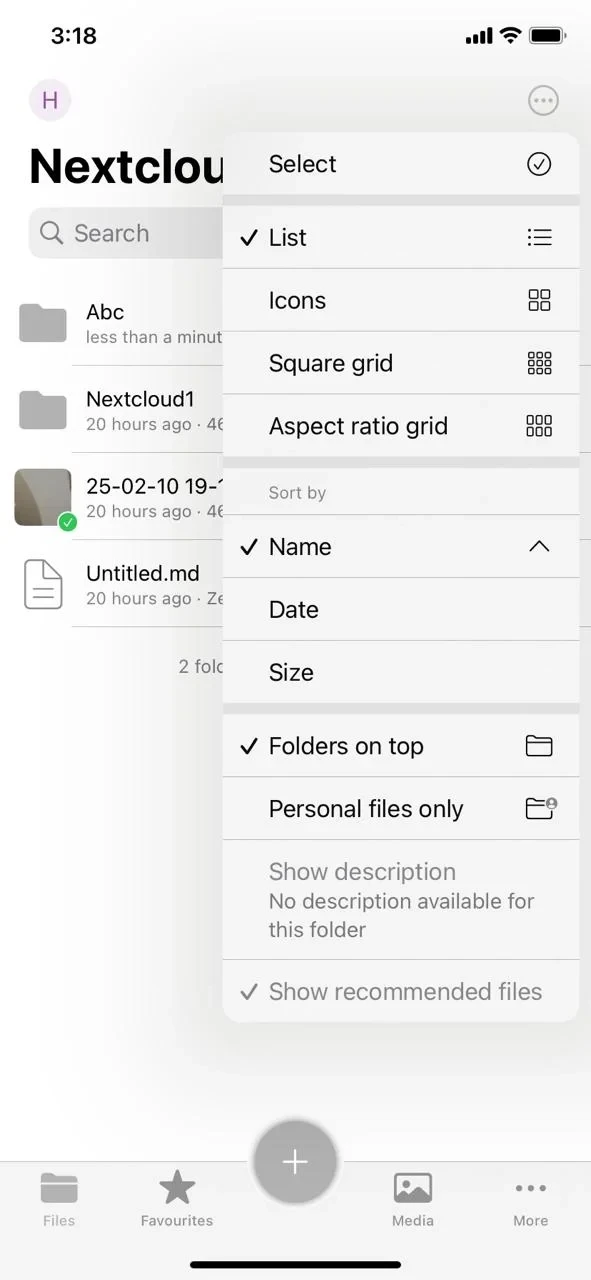
-
Select “Set as Available Offline” to download the files for offline access.
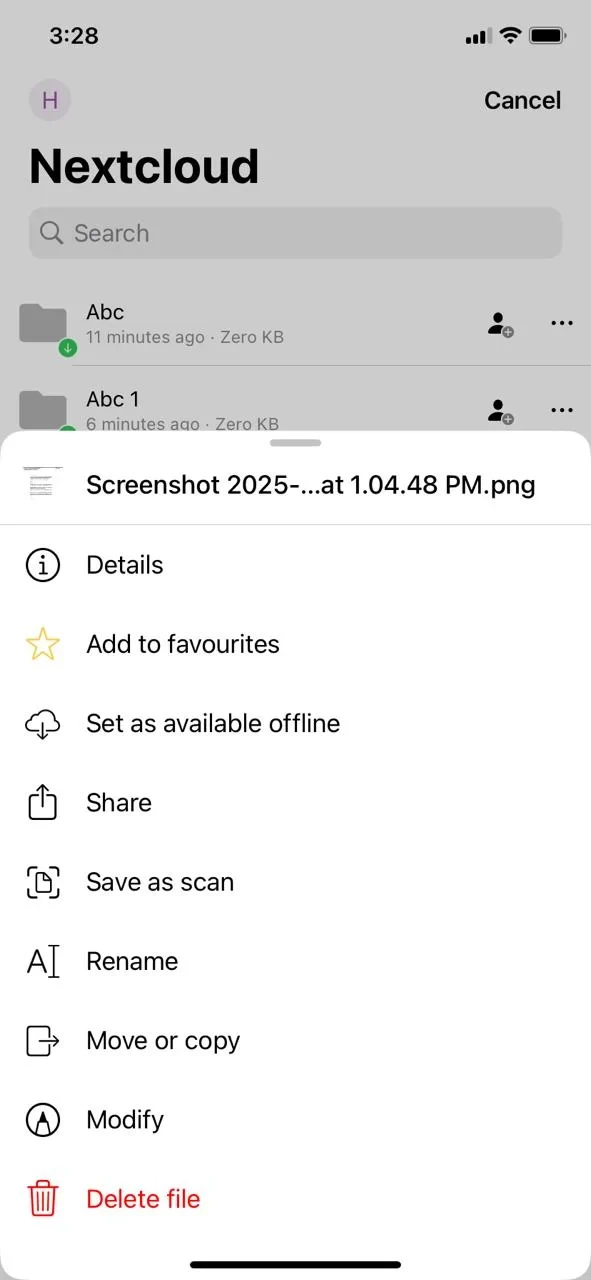
-
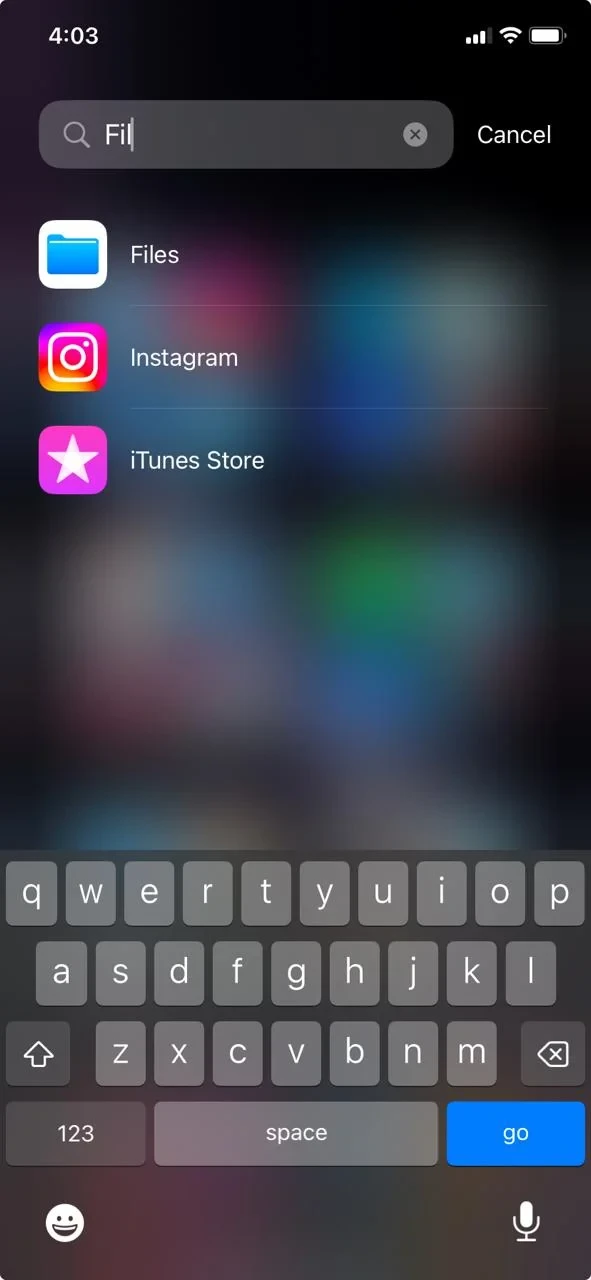
Open the Files App on your iPhone.
-
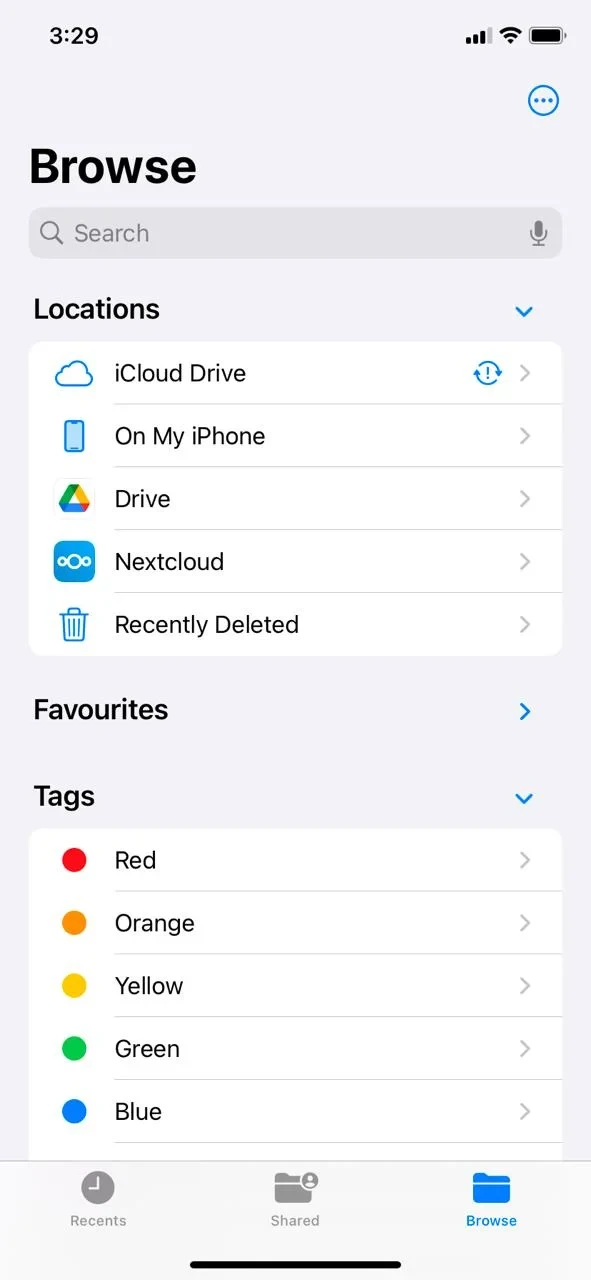
Go to “On My iPhone” or “iCloud Drive” under Locations.
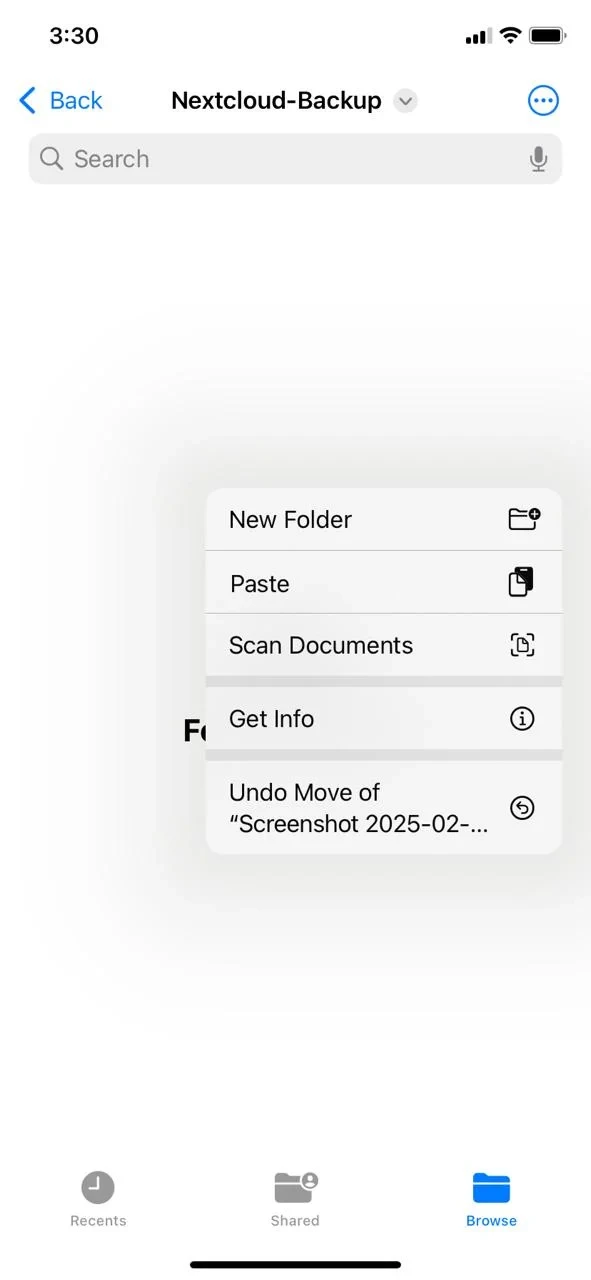
- Tap the three-dot menu (⋮) in the top-right corner and select “New Folder”.
-
Name the folder (e.g.,
Nextcloud-Backup).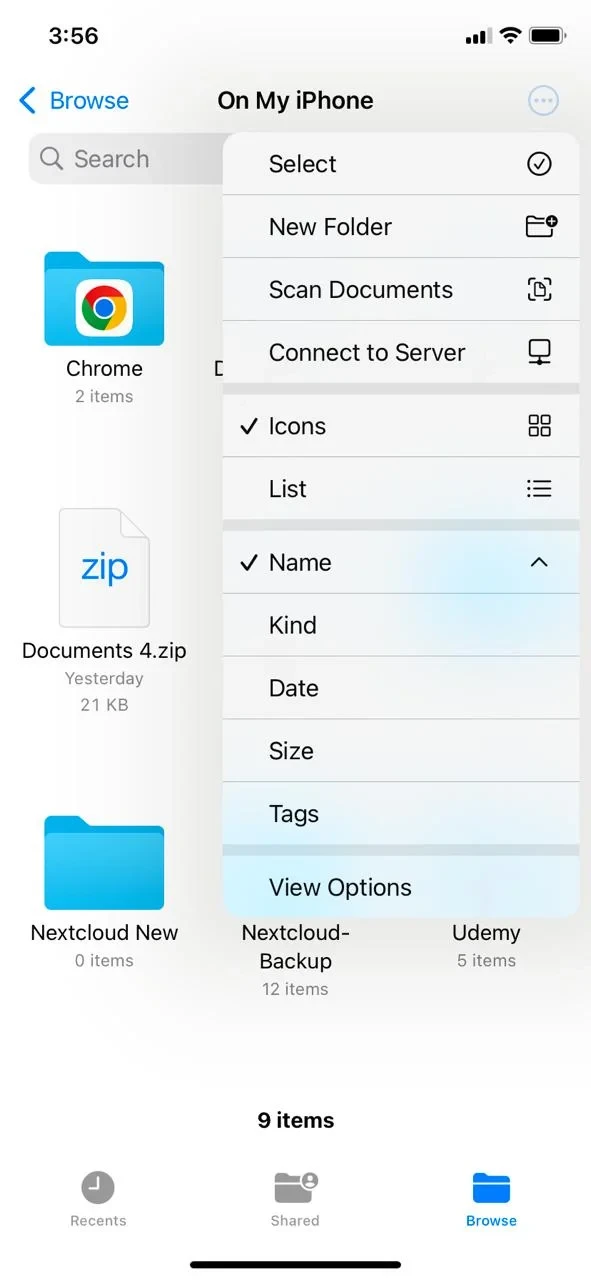
- Open the Files App on your iPhone.
- Go to “Nextcloud” under Locations.
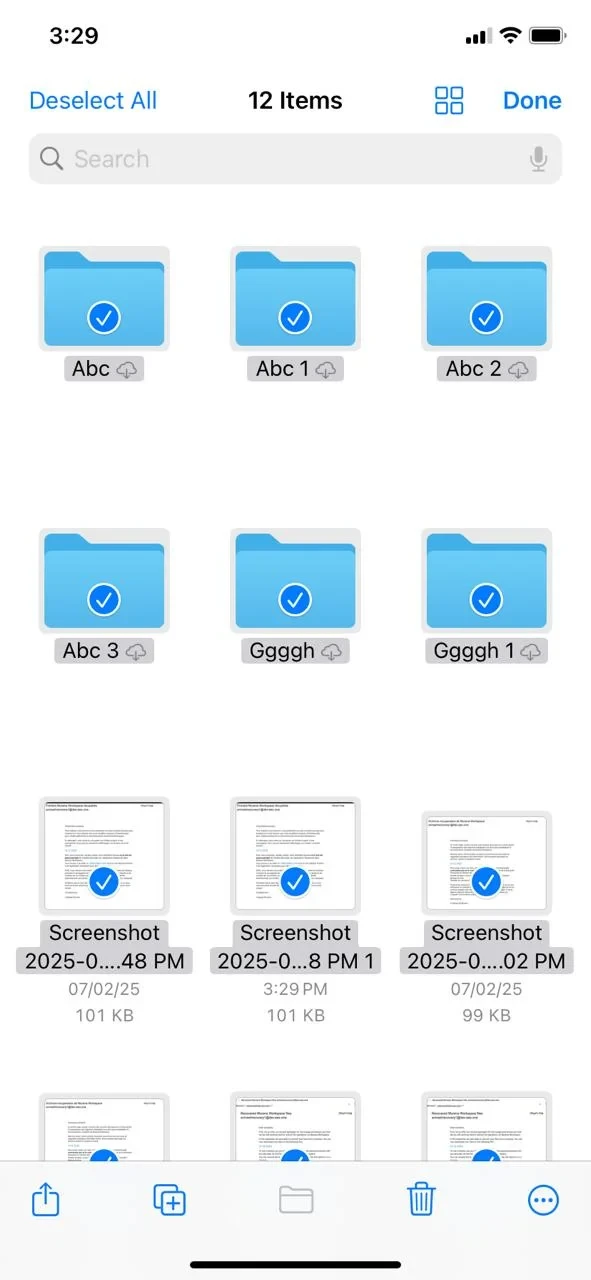
- Tap the three-dot menu (⋮) in the top-right corner and select “Select”.
-
Select All Files you want to back up.
-
Tap the three-dot menu (⋮) at the bottom and choose “Copy”.
EasySync
EasySync deletes files that are present locally but not on the server. By default, EasySync app will not sync when we reenable Murena Workspace Files entry. Please copy your files to another location.
-
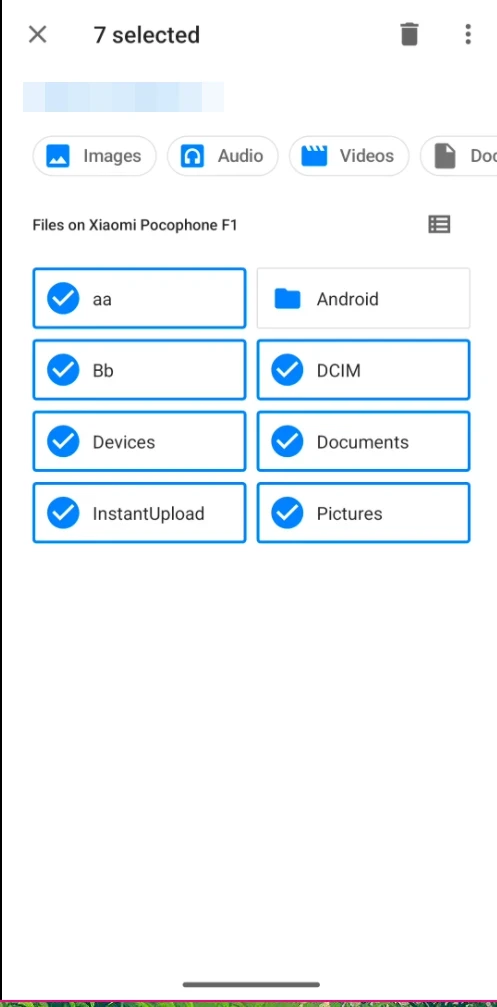
Ora fai clic sul pulsante tre punti (⋮) in alto a destra e fai clic su copia in….
-
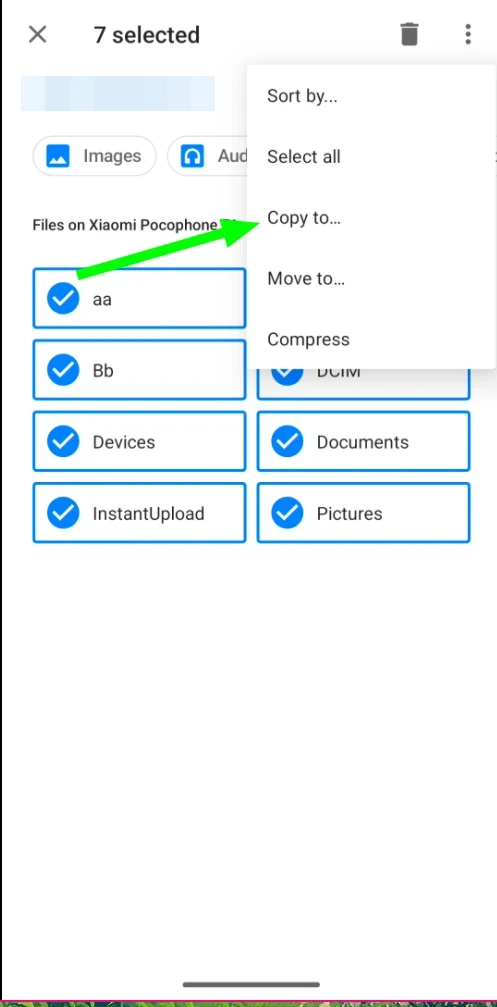
Ti porterà a una pagina diretta alla cartella principale del dispositivo. Fai clic sul pulsante aggiungi cartella per creare una nuova cartella. Ti chiederà il nome della cartella, nel nostro caso l’abbiamo chiamata
easySync.bak.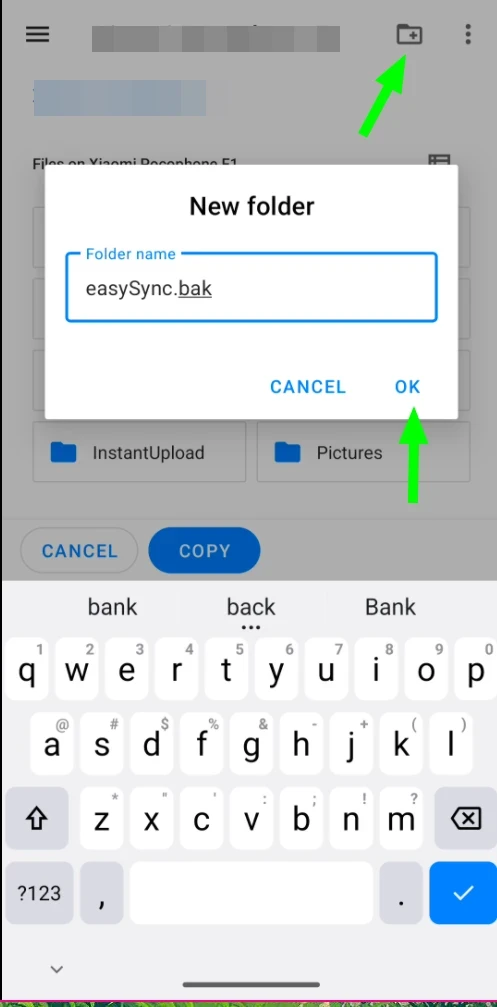
-
Ora apri la nuova cartella creata e premi il pulsante copia in basso. Questo avvierà il processo di copia.
-
Now open the newly created folder & press the copy button from the bottom of the screen. It will start the copy process.
Note /e/OS
L’app Note /e/OS eliminerà le note che erano presenti sul dispositivo ma non sul server. La voce Note di Murena Workspace è attualmente disabilitata per prevenire questo comportamento. Per eseguire il backup delle tue note:
/e/OS Notes
- A breve termine: usa il pulsante Condividi
- Apri le note una per una
- Usa il pulsante di condivisione per esportare ogni nota
- Short term: Use the Share Button
- Open notes one by one
- Use the share button to export each note
- Use the lastest /e/OS Notes app
- Update to the latest /e/OS version: 2.9 or above
- OR, Update to the latest App Lounge which will update the notes app by following this documentation
- OR, update the notes app manually by installing the latest apk from here
- Go to
Notes's burger menu>Settings>Export notes - Your notes are saved in
- Internal_Storage/Notes/Note_2.md for uncategorized notes
- Internal_Storage/Notes/
/Note_1.md for categorized notes
Nextcloud Notes
- Open notes one by one
-
Use the share button to export each note
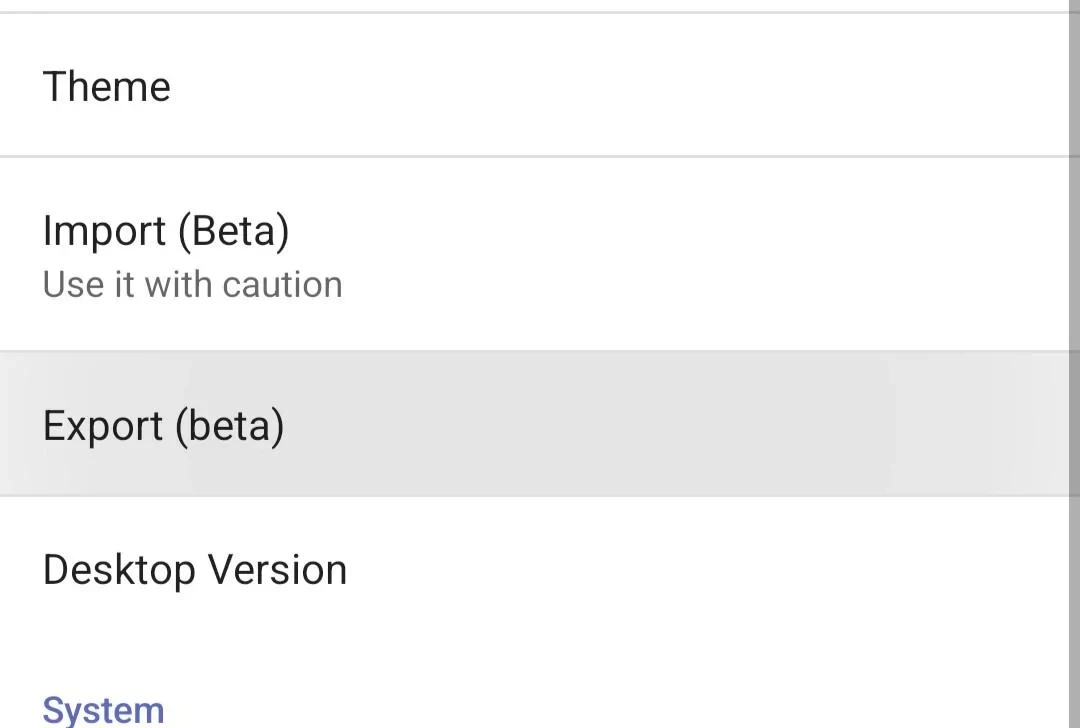{: height="400" } - Vai alla cartella che desideri utilizzare per il backup e premi il pulsante Salva in basso a destra
- Create the backup
- Use the three-line menu (☰) at the top left
- Select the Settings button
- Verifica il backup
- Apri l’app File
- Vai alla cartella selezionata in precedenza
- Apri carnet_archive.zip
-
Dovresti essere in grado di vedere i file
.sqdcorrispondenti alle tue note e alle cartelle, se ne avevi
-
Go to the folder you want to use for back-up, and press the Save button at the bottom right
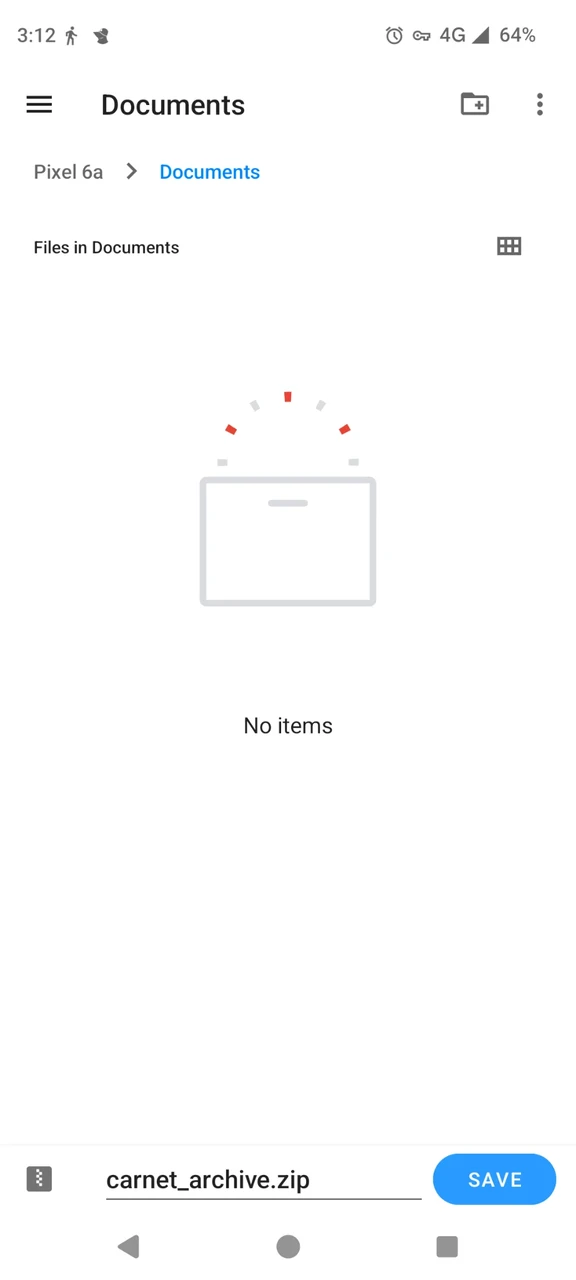
- Check the back-up
- Open the Files app
- Browse to the previously selected folder
- Open
carnet_archive.zip - You should be able to
.sqdfiles corresponding to your notes as well as folders if you had any
Client Synchronization
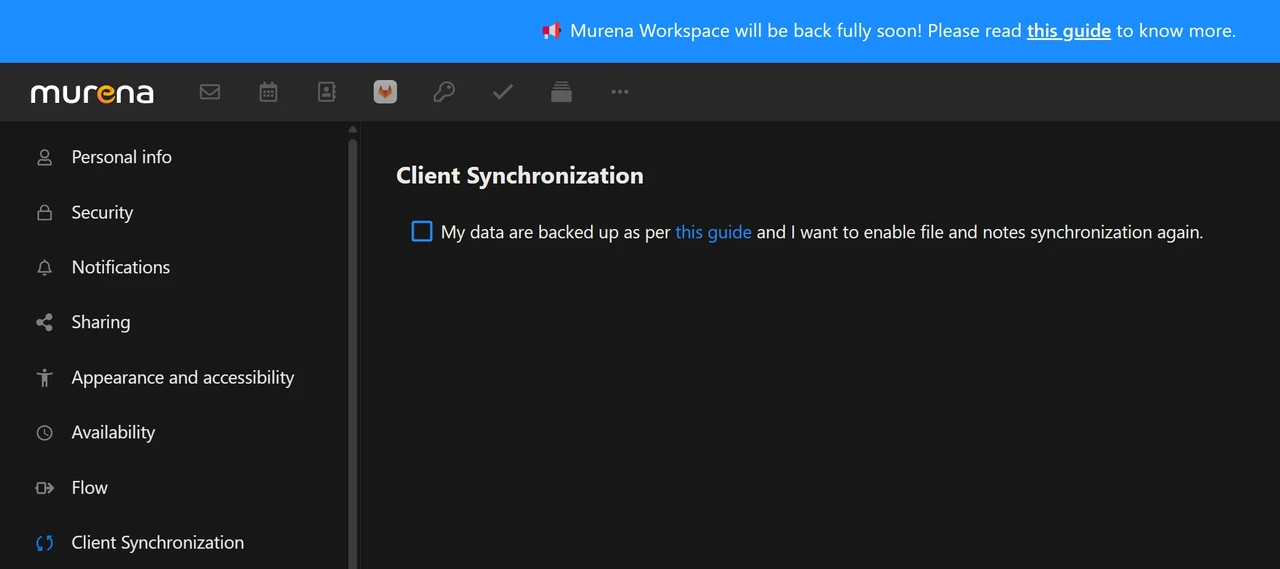
A new setting called Client Synchronization has been added to Murena Workspace’s Settings to enable synchronization for all 3rd party clients listed above and more.
For New users this setting is enabled by default but existing users need to enable it from here.
FAQ Section
Why is sync disabled?
- Sync is disabled to prevent data loss during the recovery process.
When can I re-enable sync?
- If you’re on /e/OS 2.9 or newest, synchronization is working without any action from your side.
- If you’re on an oldest version, you can re-enable sync as soon as you have backed-up all your data on your phone by ticking the checkbox in the Client Synchronization entry of your Murena Workspace settings.
Will the size of the MurenaRecovery folder impact my storage space?
- No, the
MurenaRecoveryfolder is not included in the calculation of your used storage space.
For how long will the MurenaRecovery folder be visible for users ?
- We currently have not set an end date. However, we plan to keep it available for at least a few months. We strongly recommend that users download their data from the
MurenaRecoveryfolder and save it to a secure location of their choice as soon as possible.
I am not able to see the MurenaRecovery folder yet. What should I do?
- We’re gradually rolling out the
MurenaRecoveryfolder, starting with Premium users. This process will take some time. Please wait until the end of June before contacting us, time for the rollout to complete.
How do I contact you if I am not able to see the MurenaRecovery folder at the end of June?
- Paying users can use the contact form to share details with the Helpdesk.
- Free account users can contact us by creating a post on the Forum.